1. Folasaga
This manual provides detailed instructions for the installation, operation, and maintenance of the Aiphone VM-RMVU Residential Fire Alarm Compatible Monitor Security Master Unit. Please read this manual thoroughly before using the product to ensure correct and safe operation. Keep this manual in a safe place for future reference.
2. Seti ma Fa'apipi'i
The Aiphone VM-RMVU unit is designed for wall-mounted installation. Ensure proper power supply and network connections as described below.
2.1 Fafo View ma le Fa'amauina
Refer to the diagram below for the external dimensions and mounting details. The unit requires a compatible wall box for installation.

Ata 1: Fafo view of the Aiphone VM-RMVU unit with detailed mounting dimensions. This diagram illustrates the physical layout, including the location of the power switch, sensors, microphone, speaker, and various indicator lights. It also shows the dimensions for wall-mounted installation.
2.2 Feso'ota'iga Uaea
Follow the wiring diagram carefully to connect the master unit to power, entrance units, sub-units, and other security devices. The system supports both wired and wireless LAN connections.
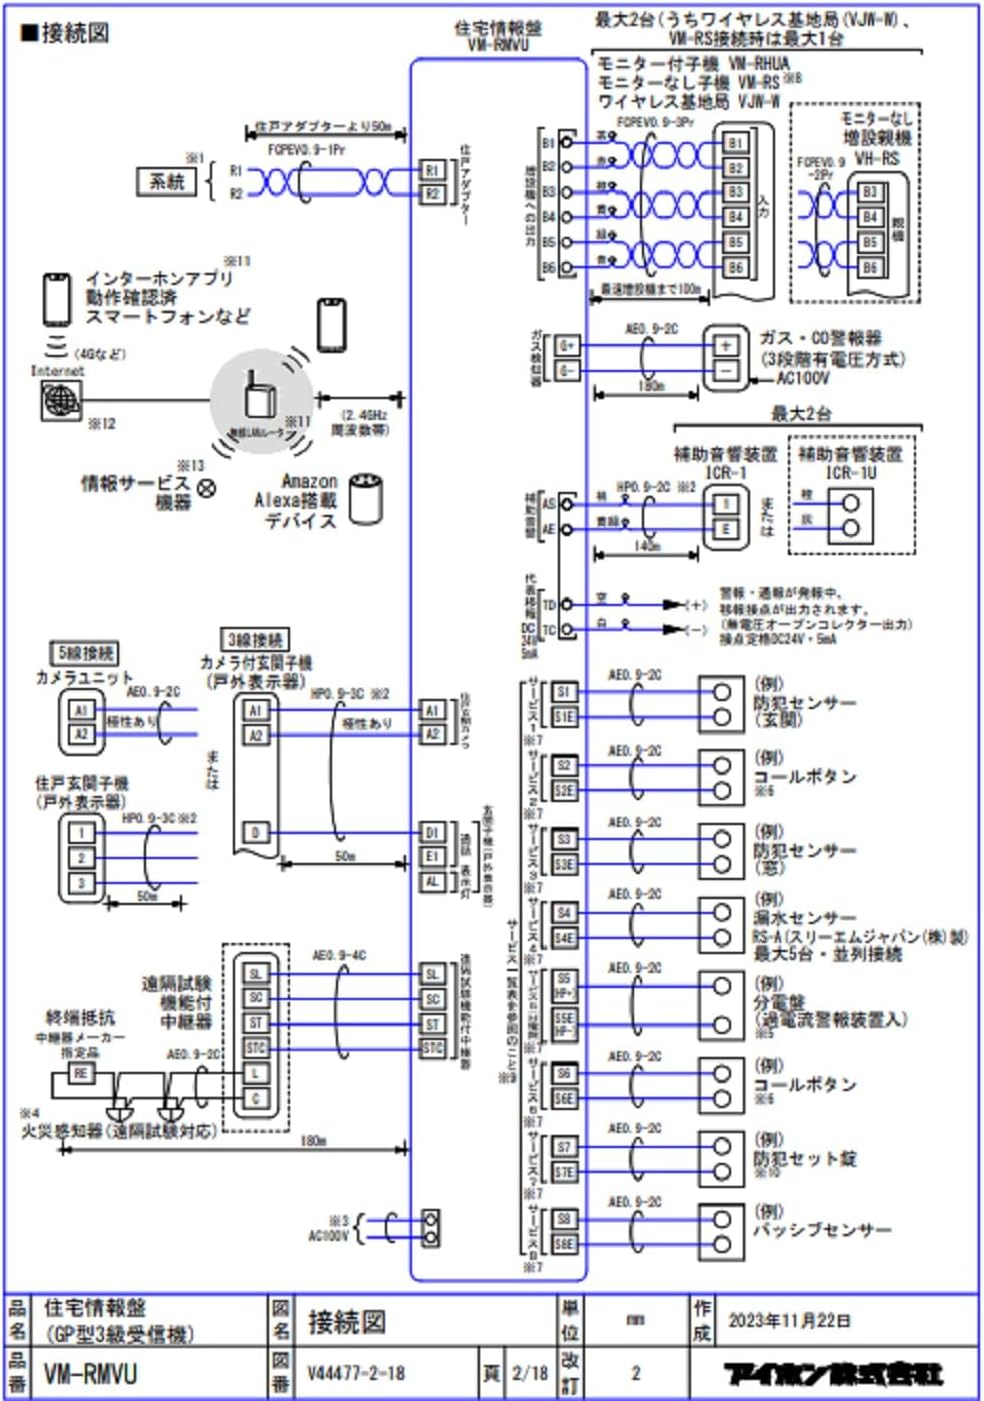
Ata 2: Comprehensive wiring diagram for the Aiphone VM-RMVU system. This diagram details connections for power, entrance units, monitor sub-units, wireless base stations, extension master units, gas/CO alarms, auxiliary alarm devices, call buttons, security set panels, and passive sensors. It also illustrates connections for internet apps, smartphones, and Amazon Alexa devices via wireless LAN.
Paoa sapalai:
- Connect the unit to an AC100V, 50/60Hz power source.
- Ensure the power switch (located on the rear panel) is in the OFF position before connecting.
Feso'ota'iga feso'ota'iga:
- The VM-RMVU supports wireless LAN (IEEE 802.11b/g/n) for connection to internet apps, smartphones, and Amazon Alexa devices.
- Refer to the separate wireless LAN setup guide for detailed configuration instructions.
3. Fa'atonuga o Galuega
The Aiphone VM-RMVU features a 7-inch TFT LCD touch panel and intuitive buttons for various functions.

Ata 3: Front panel of the Aiphone VM-RMVU showing the 7-inch LCD display and control buttons. Key buttons include EMERGENCY, POWER indicator, TALK, OFF, OPEN, and ALARM STOP. The model name 'AIPHONE VM-RMVU' is also visible below the screen.
3.1 Galuega Autu
- Malosi/Pepe: Press the power switch on the rear panel to turn the unit on or off. The green POWER indicator will illuminate when on.
- Taliina Valaau: When an entrance unit calls, the display will show the caller. Press the TALANOAGA button to initiate a simultaneous call. The green TALK indicator will light up.
- Fa'ai'u Valaau: Oomi le TOTO button to end a call. The red OFF indicator will light up briefly.
- Faitotoa Tatala: I le taimi o se valaau, fetaomi le TATALA button to unlock the connected door. The green OPEN indicator will light up.
3.2 Security and Alarm Functions
- Ki fa'alavelave fa'afuase'i: Oomi le FUAFUAGA button in case of an emergency to trigger an alarm.
- Alarm Stop: If an alarm sounds (e.g., fire, gas, security alert), press the TOTO ALAMO button to silence it. The red ALARM STOP indicator will light up when an alarm is active.
- Security Display: The security display unit provides visual indicators for Fire, Gas, and Security Alert statuses.
3.3 Touch Panel Operation
The 7-inch TFT LCD is a touch panel. Navigate through menus and settings by tapping on the screen icons and options. Refer to the on-screen guide for specific menu functions.
4. Tausiga
Regular maintenance ensures the longevity and optimal performance of your Aiphone VM-RMVU unit.
- Fa'amamaina: Use a soft, dry cloth to clean the unit's surface and display. Do not use abrasive cleaners or solvents.
- Asiasiga: Periodically check all connections for security and ensure no cables are damaged.
- Fa'afouga polokalame: Siaki le gaosi oloa website for any available firmware updates to ensure your unit has the latest features and security enhancements.
5. Faʻafitauli
If you encounter issues with your Aiphone VM-RMVU unit, refer to the following common troubleshooting steps:
- Leai se Malosi: Ensure the power cable is securely connected and the power switch on the rear panel is ON. Check your circuit breaker.
- Leai se Vitio/Leo: Verify all wiring connections to entrance units and sub-units. Ensure network connectivity for wireless functions.
- Alarm Malfunction: Check the status indicators on the security display unit. If the issue persists, contact customer support.
- Touch Panel Unresponsive: Try restarting the unit by turning the power off and on. If the problem continues, contact support.
For more complex issues, please consult a qualified technician or Aiphone customer support.
6. Fa'amatalaga
| Fa'aaliga | Fa'amatalaga |
|---|---|
| Fa'ailoga | Aiphone |
| Numera Fa'ata'ita'i | VM-RMVU |
| Malosiaga Voltage | AC100V: 50/60Hz |
| Fa'aaogāga Malosiaga | Standby 6W: Max 17W |
| Valaau Metotia | Simultaneous Call Method |
| Fa'aaliga | 7-inch TFT LCD Display (Touch Panel) |
| Numera o Pixel | Pe tusa. 1.15 miliona pika |
| LAN uaealesi | IEEE 802.11b/g/n (2.4GHz) |
| Fua o Mea (LxWxH) | 18 x 22 x 4.5 cm |
| mamafa | Pe tusa. 880g |
| Galulue Ambient Temperature | 0 i le 40°C |
| Fa'aaofia Vaega | Vaega Autu |
7. Fa'amaonia ma Lagolago
For warranty information, technical support, or service inquiries, please refer to the official Aiphone website or contact your local Aiphone distributor. Keep your purchase receipt as proof of purchase.
Aiphone Official Webnofoaga: www.aiphone.com


