1. Folasaga
This manual provides detailed instructions for the setup, operation, maintenance, and troubleshooting of your Xprinter XP-233B Thermal Barcode Printer. The XP-233B is designed for efficient thermal printing of barcodes and labels, utilizing heat-sensitive paper without the need for ink or ribbons.
2. Faatonuga Saogalemu
- Ensure the printer is connected to a power source with the correct voltage as specified on the power adapter.
- Aua ne'i fa'aalia le masini lomitusi i le vai pe susū tele.
- Aloese mai le tu'uina o le lomitusi i le susulu sa'o o le la po'o latalata i puna vevela.
- Keep the printer away from dust and debris to prevent damage to internal components.
- Aua le taumafai e tatala pe toe faaleleia oe lava le masini lomitusi. Faafesootaʻi tagata faigaluega agavaa mo se fesoasoani.
- Use only recommended thermal label rolls to ensure optimal print quality and printer longevity.
3. Mea i totonu o le afifi
Fa'amautinoa o lo'o iai mea uma i totonu o le afifi:
- Xprinter XP-233B Thermal Barcode Printer
- Fetuunaiga Malosi
- Uaea USB
- Ta'iala Amata vave (pe a iai)
- Driver CD (if included, drivers can also be downloaded online)
4. Oloa Ua Ovaview
Familiarize yourself with the main components of the XP-233B printer.

Ata 4.1: Itu i luma view of the Xprinter XP-233B, showing the power switch, control panel, and label output slot.

Ata 4.2: Tua view of the Xprinter XP-233B, highlighting the USB, Ethernet, and power input ports.
Galuega Fa'atonu:
- FEED button: Press to feed a blank label. Hold to perform a self-test print.
- PAUSE Button: Pauses or resumes printing.
- Fa'amau fa'aleaogaina: Cancels the current print job.
- Fa'ailoga LED: Display printer status (e.g., Power, Error, Paper Out). Refer to troubleshooting for specific light patterns.
5. Seti
5.1 Feso'ota'i le Lomitusi
- Connect the power adapter to the printer's power input port and then plug it into a wall outlet.
- Connect the USB cable from the printer to your computer. For Ethernet connectivity, connect an Ethernet cable from the printer to your network router or switch.
- Fa'aola le lomitusi e fa'aaoga ai le ki o lo'o i le itu.
5.2 Loading Labels
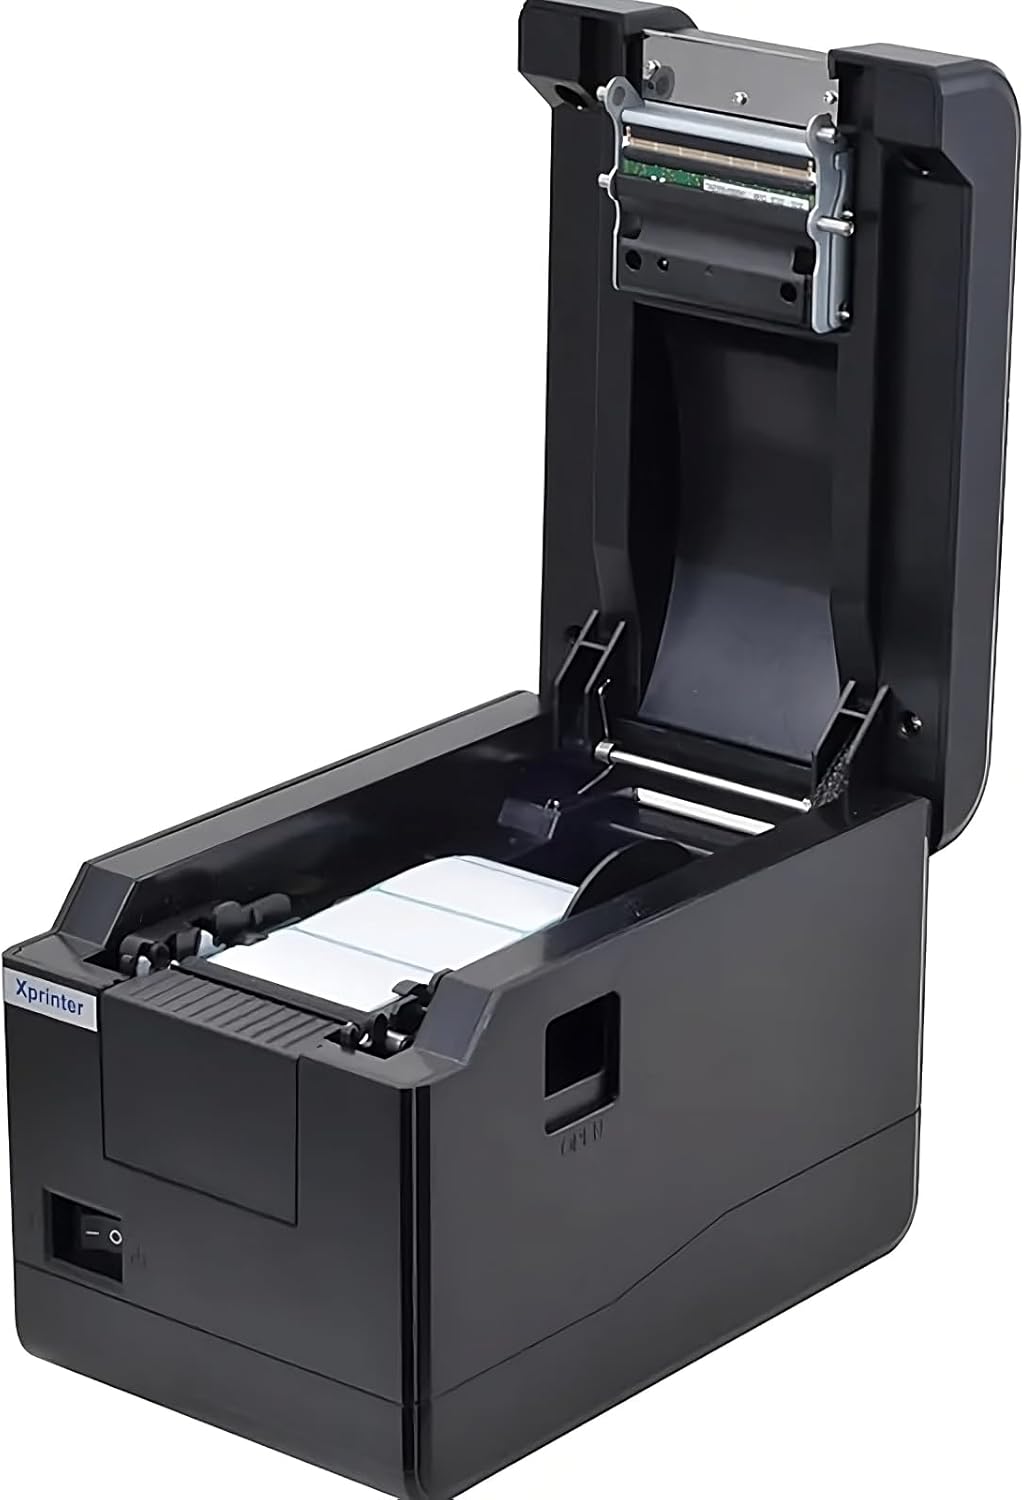
Ata 5.1: I luga-lalo view of the Xprinter XP-233B with the cover open, illustrating the label loading area.
- Press the 'OPEN' button on the side of the printer to open the top cover.
- Place the thermal label roll into the label compartment, ensuring the labels feed from the bottom of the roll and the printable side faces upwards.
- Adjust the movable label guides to fit the width of your label roll snugly, without pinching the labels.
- Pull a few labels past the print head and out through the front slot.
- Tapuni ma le fa'amau le ufi pito i luga se'ia kiliki i lona nofoaga sa'o.
- The printer will automatically calibrate and feed a few labels to detect the label gap.
5.3 Fa'apipi'i Aveta'avale
Install the printer drivers on your computer. Drivers can typically be found on the included CD or downloaded from the official Xprinter webnofoaga. Mulimuli i fa'atonuga i luga ole lau mo fa'apipi'i.
6. Fa'agaoioia o le Lomitusi
6.1 Lomitusi Fa'avae
Once the printer is set up and drivers are installed, you can print labels from your application (e.g., label design software, shipping software). Ensure the correct printer model (Xprinter XP-233B) is selected in your application's print settings.
6.2 Lolomiina o le Su'ega a le Tagata Lava Ia
To perform a self-test print:
- Ensure the printer is powered on and labels are loaded.
- Oomi ma uu le FAIGA button for approximately 3-5 seconds until the printer starts printing.
- The self-test print will display printer information and a test pattern, confirming basic functionality.
7. Tausiga
7.1 Fa'amamaina o le Ulu Lomitusi
Regular cleaning of the print head ensures optimal print quality and extends the printer's lifespan. Clean the print head when print quality degrades or after every few rolls of labels.
- Turn off the printer and disconnect the power cord.
- Tatala le faavaa pito i luga.
- Gently wipe the print head surface with a cotton swab lightly dampened with isopropyl alcohol (70% or higher).
- Allow the print head to dry completely (approximately 2-3 minutes) before closing the cover and turning on the printer.
7.2 Fa'amamaina o fafo
Solo le pito i fafo o le lomitusi i se solo vaivai.amp ie. Aua ne'i fa'aogaina vaila'au malolosi po'o ni mea fa'amama.
8. Faʻafitauli
| Fa'afitauli | Mafuaaga e ono tupu | Fofo |
|---|---|---|
| Ua le ola le lomitusi | Power cord loose; power outlet faulty; power adapter damaged. | Check power connections; try a different outlet; replace power adapter if necessary. |
| No labels feeding | Labels incorrectly loaded; paper out; label guides too tight. | Reload labels correctly; replace label roll; adjust label guides. |
| Poor print quality (faded, lines) | Print head dirty; low-quality labels; print head damaged. | Clean print head (refer to Section 7.1); use recommended thermal labels; contact support if print head is damaged. |
| Printer not responding to print commands | Incorrect driver installed; USB/Ethernet cable loose; printer paused. | Reinstall drivers; check cable connections; press TOTO ki e toe amata ai. |
| Labels skipping or misaligning | Incorrect label sensor calibration; label guides not set correctly. | Perform a self-test print to recalibrate; adjust label guides. |
9. Fa'amatalaga
| Fa'aaliga | Fa'amatalaga |
|---|---|
| Igoa Fa'ata'ita'iga | Xprinter - Thermal barcode printer |
| Numera Fa'ata'ita'i Mea | XP-233B |
| Tekonolosi lomitusi | Mafanafana |
| Tekinolosi Feso'ota'i | Ethernet, USB |
| Fa'asologa o Lomitusi | Monochrome |
| Fa'asalalau Fa'asalalau | Fa'ailoga |
| Malosiaga Maualuga o Pepa | 100 (typical for roll capacity, actual sheet capacity depends on label size) |
| Fua o Mea (D x W x H) | 26.8 x 18 x 17.2 cm |
| Mea mamafa | 1.2 kilokalama |
| Lanu | Lanu uliuli |
10. Fa'amatalaga Fa'amaonia
Xprinter products typically come with a limited manufacturer's warranty. Please refer to the warranty card included with your product or visit the official Xprinter website for specific warranty terms and conditions, including coverage duration and service procedures. Keep your purchase receipt as proof of purchase for warranty claims.
11. Lagolago Tagata Fa'atau
For technical assistance, driver downloads, or further inquiries regarding your Xprinter XP-233B, please visit the official Xprinter support website or contact their customer service department. Contact information can usually be found on the Xprinter webupega tafaʻilagi poʻo pepa o loʻo tuʻuina atu faʻatasi ma lau masini lomitusi.


