1. Folasaga
The EARU Automatic Voltage Protector (Model EARU-1005) is an advanced electrical safety device designed to protect your valuable home and office appliances from damaging power fluctuations. This device offers comprehensive protection against over-voltagu, lalo-voltage, and overcurrent conditions, ensuring the longevity and safe operation of your electrical equipment. It features adjustable thresholds and an auto-reconnect function for convenience and continuous protection.
2. Vaega Autu
- All-in-One Protection: Safeguards appliances from power surges, over-voltage (above 275V), under-voltage (below 175V), and adjustable overcurrent (1A-63A).
- Fa'atonu Fa'atonu: Customizable cut-off thresholds for over-voltage (200V-275V) and under-voltage (175V-200V) to suit specific grid conditions and appliance needs.
- Fa'atonu-Toe Fa'atonu Galuega: Automatically restores power within 60-300 seconds once grid voltage stabilizes within the set safe range, eliminating manual intervention.
- Fa'atinoina Lelei: Constructed with 100% pure copper conductors for minimal resistance, efficient operation, and enhanced long-term reliability under heavy 63A loads.
- Fa'apipi'i DIN Rail: Designed for easy and secure integration into standard 2-Pole, 36mm width DIN Rail electrical panels.
- Saogalemu atoatoa: Provides robust protection for an entire household against unpredictable voltagu fesuiaiga ma si'itia.
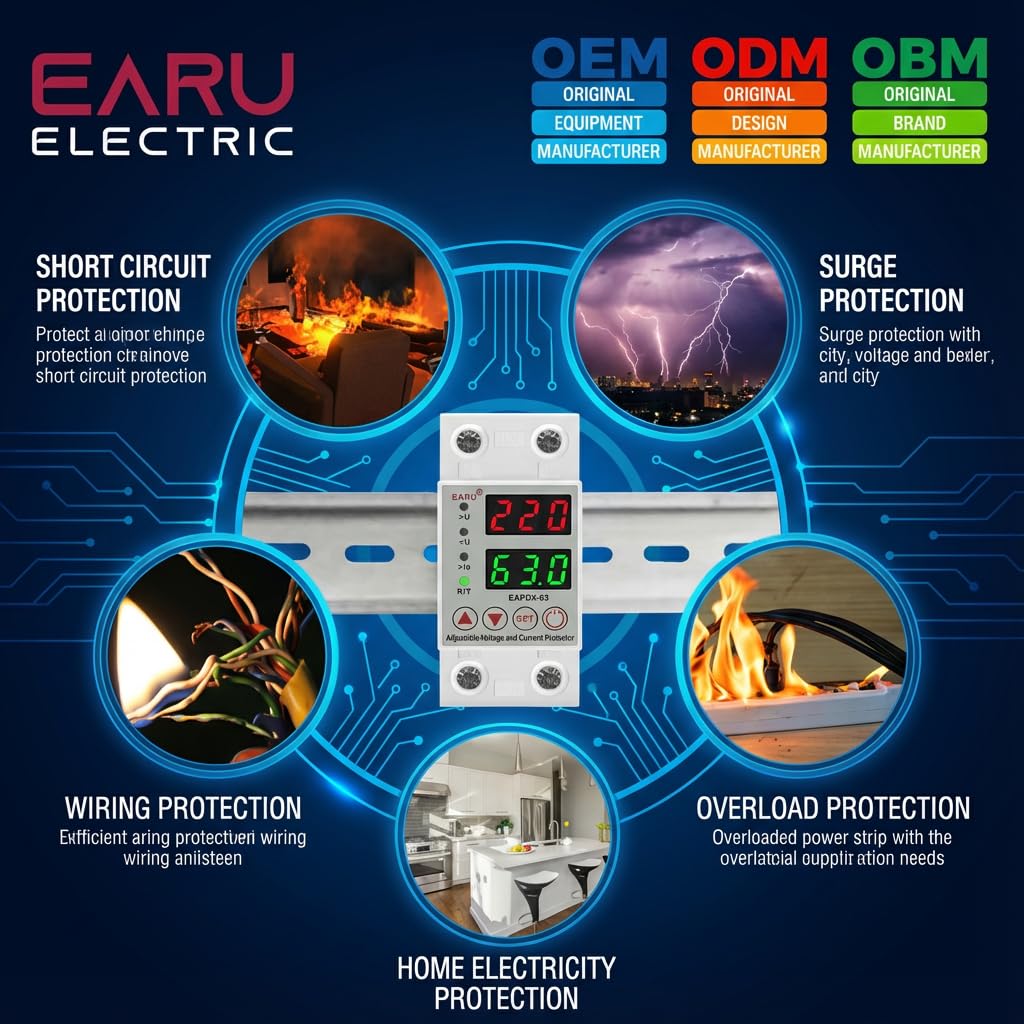
Ata 2.1: Ua umaview of the protection capabilities of the EARU Automatic Voltage Puipuia.
3. Fa'amatalaga Saogalemu
Please read and understand all safety instructions before installing or operating the device. Failure to do so may result in electric shock, fire, or serious injury.
- Installation should only be performed by a qualified electrician in accordance with local electrical codes and regulations.
- Ensure the main power supply is disconnected before any installation or maintenance work.
- Aua le fa'aogaina le masini pe afai e foliga mai ua fa'aleagaina pe ua susu.
- Verify correct wiring connections (Line and Neutral) to prevent malfunction or damage.
- Ua mamanuina le masini mo na'o totonu.
- Aua ne'i sili atu i le fua faatatau maualuga o le eletise ua i ai nei o le 63A.
4. Oloa Ua Ovaview
4.1. Components and Display
The EARU Automatic Voltage Protector features a clear digital display and intuitive control buttons for easy monitoring and adjustment.
- Voltagu Fa'aali: Shows the current line voltage.
- Fa'aaliga i le taimi nei: Shows the current load in Amperes.
- Molī Fa'ailoga:
>U: Ova-voltagu faʻailoga.<U: Lalo-voltagu faʻailoga.>Ie: Overcurrent indicator.R/T: Reset/Time indicator.
- Pule Fa'amau:
- Up Arrow (▲) / Down Arrow (▼): Used to adjust parameter values.
- SET button: Press and hold for 3 seconds to enter setting mode.
- Fa'amau Malosi/Pepe: Toggles power to the protected circuit.
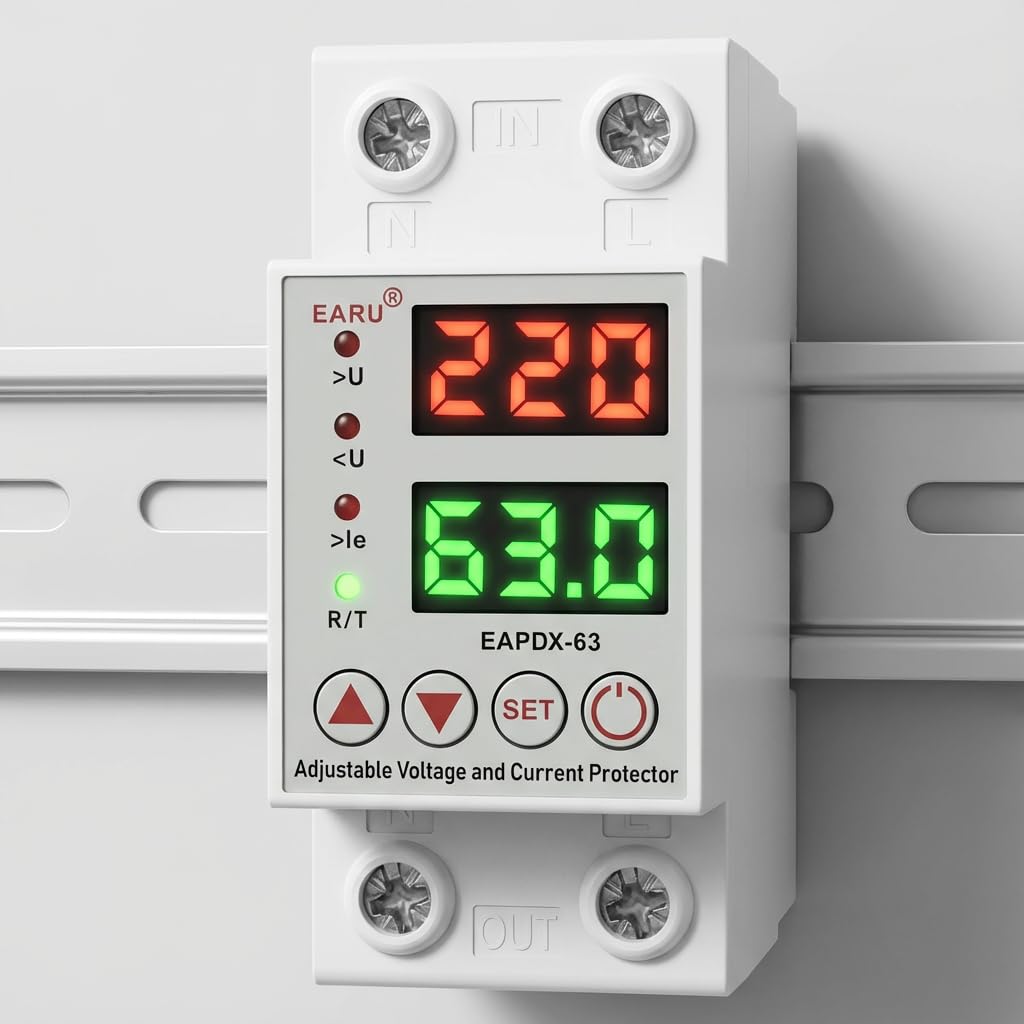
Ata 4.1: Luma view of the EARU Automatic Voltage Protector, highlighting its digital display and control buttons.
5. Seti ma Fa'apipi'i
The EARU Automatic Voltage Protector is designed for DIN Rail mounting. Ensure proper wiring and secure installation.
5.1. Fa'amauina
Mount the device onto a standard 36mm width DIN Rail within your electrical panel. Ensure it is securely clipped into place.
5.2. Mauga ata
Connect the incoming power supply (Line and Neutral) to the "IN" terminals and the outgoing load to the "OUT" terminals. Refer to the diagram below for correct wiring.

Ata 5.1: Esoample wiring configuration for DIN Rail installation.

Image 5.2: Device dimensions for installation planning.
6. Fa'atonuga o Galuega
The device allows for precise adjustment of protection parameters. Follow these steps to configure your voltage puipui.
6.1. Parameter Setting Mode
- Ia mautinoa ua ola le masini.
- Oomi ma uu le FA'ATU button for approximately 3 seconds until the display changes to show "P-1" or a similar setting indicator. This indicates you are in parameter setting mode.
- Fa'aaoga le Aū i Luga (▲) ma Aū i lalo (▼) buttons to navigate through the different parameters (P-1 to P-6).
- Once you have selected a parameter, press the FA'ATU button briefly to enter its adjustment mode.
- Fa'aaoga le Aū i Luga (▲) ma Aū i lalo (▼) faamau e sui ai le tau.
- Oomi le FA'ATU button again to confirm the value and move to the next parameter, or wait a few seconds for the device to automatically save and exit the setting mode.
6.2. Fa'amatalaga Parameter
| Parameter | Fa'amatalaga | E mafai ona fetuunai |
|---|---|---|
| P-1 | Sili-voltagu faatulagaga | 240V - 300V (or OFF) |
| P-2 | Lalo-voltagu faatulagaga | 140V - 200V (or OFF) |
| P-3 | Overcurrent setting | 1A - 40A / 63A / 80A (depending on model) |
| P-4 | Reset/start delay | 1s - 300s |
| P-5 | Relay recovery delay | 1s - 300s |
| P-6 | Overcurrent recovery delay | 1s - 300s |
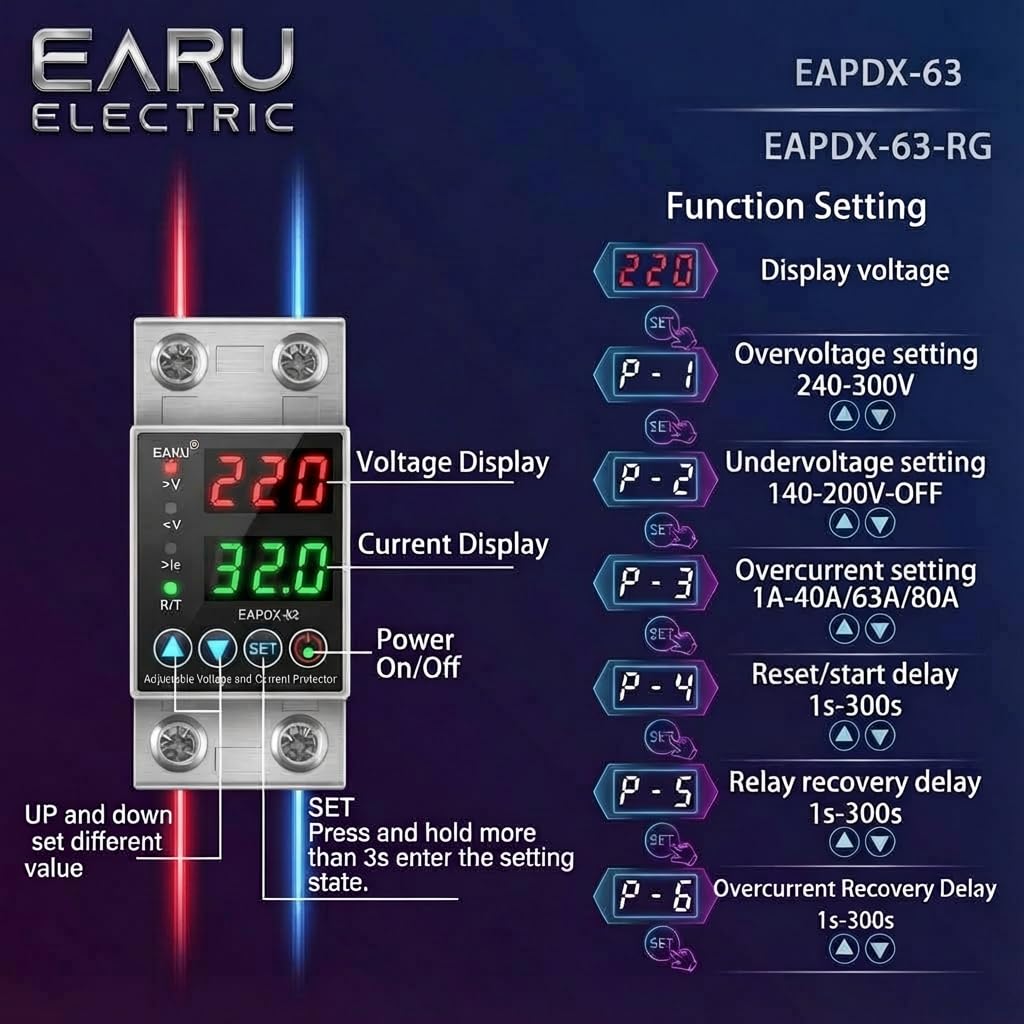
Image 6.1: Function setting guide for the device.
6.3. Video Guide: Setting Parameters
Video 6.1: This video demonstrates how to adjust the over-voltagu, lalo-voltage, overcurrent, and recovery delay settings on the EARU Automatic Voltage Protector. It shows the step-by-step process of entering the setting mode and modifying each parameter.
7. Tausiga
The EARU Automatic Voltage Protector requires minimal maintenance. Regular checks can ensure optimal performance.
- Periodically inspect the device for any visible damage or loose connections.
- Ia mautinoa o avanoa e fa'aoso ai le ea e leai se pefu ma otaota e puipuia ai le soona vevela.
- Clean the exterior with a dry, soft cloth. Do not use liquid cleaners or solvents.
- Do not attempt to open or repair the device yourself. Refer to qualified personnel for servicing.
8. Faʻafitauli
If you encounter issues with your EARU Automatic Voltage Protector, refer to the following common troubleshooting steps:
| Fa'afitauli | Mafuaaga e ono tupu | Fofo |
|---|---|---|
| Ua le ola le masini | Leai se eletise e ulufale ai; uaea sese; faaletonu i totonu. | Check main power supply. Verify wiring connections. If problem persists, contact support. |
| Power cuts off frequently | Voltage/current outside set thresholds; unstable grid. | Check current voltage/current readings. Adjust P-1, P-2, P-3 settings if necessary. Monitor grid stability. |
| Device does not auto-reconnect | Recovery delay (P-4, P-5, P-6) set too long; persistent fault. | Verify recovery delay settings. Ensure grid conditions have stabilized. Manually reset if safe to do so. |
| Le sa'o voltage/current reading | Calibration issue; faulty sensor. | Fa'afeso'ota'i le lagolago a tagata fa'atau mo se fesoasoani. |
9. Fa'amatalaga
| Fa'aaliga | Fa'amatalaga |
|---|---|
| Fa'ailoga | EARU |
| Fa'ata'ita'iga | EARU-1005 |
| Fua o Mea (LxWxH) | 7.7 x 3.5 x 6.5 cm |
| Mea mamafa | 450 g |
| Sao Voltage | 230 Volt AC |
| Max Wattage | 13800 Watts |
| Max Nei | 63 Amperes |
| Sili-voltagu Nofoaga Puipuia | Adjustable 200V-275V (Cut-off above 275V default) |
| Lalo-voltagu Nofoaga Puipuia | Adjustable 175V-200V (Cut-off below 175V default) |
| Auto-Reconnect Delay | Fa'atonu 60-300 sekone |
| Ituaiga Fa'amau | DIN Rail (2-Pole, 36mm width) |
| Mea Fa'atonu | 100% Pure Copper |
| Atunuu na Afua mai ai | Initia |
10. Fa'amaonia ma Lagolago
The EARU Automatic Voltage Protector (Model EARU-1005) is backed by a 1-Year Manufacturer Warranty. This warranty covers defects in materials and workmanship under normal use.
- For warranty claims or technical support, please contact EARU customer service.
- Taofi lau lisiti o le fa'atauga e fai ma fa'amaoniga o le fa'atauga mo le fa'amaoniaina o le tusi saisai.
- O lipea po'o suiga e le'i fa'atagaina o le a fa'aleaogaina ai le saisai.