1. Folasaga
The Raspberry Pi 5 is the latest addition to the Raspberry Pi lineup, representing a significant leap in performance and capability. It boasts impressive enhancements, including a faster Broadcom BCM2712 SoC, with a 2.4GHz ARM Cortex-A76 CPU and a VideoCore VII GPU that supports OpenGL ES 3.1 and Vulkan 1.2. A new disaggregated chiplet architecture improves the digital functions of the board. The intricately designed RP1 is the new I/O controller for Raspberry Pi 5 and strengthens the USB, Ethernet, camera, display, and general-purpose interfaces. The Renesas DA9091 PMIC comes with a real-time clock, which has circuitry for external power supply, and a PC-style power button, which supports hard and soft power-on/off events. The Raspberry Pi 5 is a versatile and powerful single-board computer suitable for a wide range of applications, including DIY projects, educational tools, media centers, servers, desktop computers, and various IoT applications, making it the recommended choice for professionals and tech enthusiasts alike.
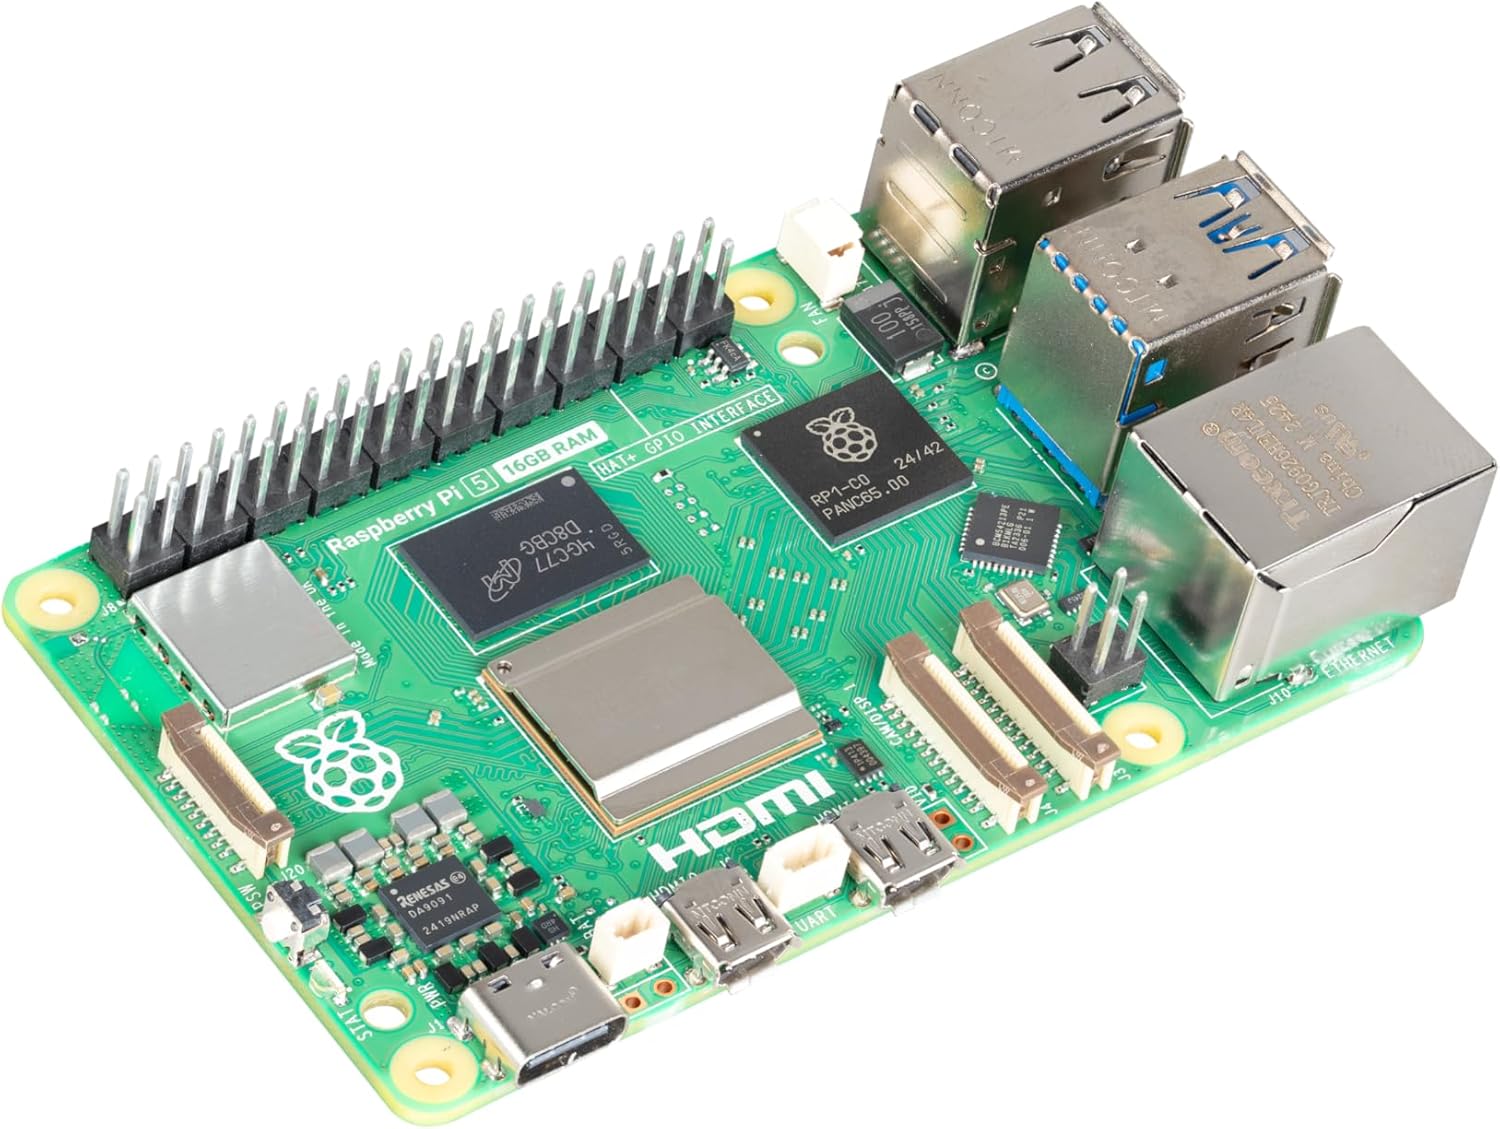
Figure 1.1: The Raspberry Pi 5 (16GB) single-board computer, showcasing lona mamanu fa'atusatusa ma uafu eseese.
2. O a mea oi totonu o le Pusa
Your Raspberry Pi 5 (16GB) package should contain the following items:
- Raspberry Pi 5 (16GB) Board
Fa'aaliga: Additional accessories such as a power supply, microSD card, case, and peripherals are sold separately and are required for full functionality.
3. Seti Taiala
Follow these steps to set up your Raspberry Pi 5:
- Prepare the Operating System: Download the latest Raspberry Pi OS image from the official Raspberry Pi website. Use a tool like Raspberry Pi Imager to write the OS image to a high-quality microSD card (minimum 8GB, Class 10 or higher recommended).
- Fa'aofi le MicroSD Card: Carefully insert the prepared microSD card into the card slot on the underside of the Raspberry Pi 5 board.
- Fesootai Peripherals:
- Connect a display to one of the two micro-HDMI ports using a micro-HDMI to HDMI cable.
- Connect a USB keyboard and mouse to the USB 2.0 or USB 3.0 ports.
- (Optional) Connect an Ethernet cable to the Gigabit Ethernet port for wired network access.

Figure 3.1: Detail of the Gigabit Ethernet port and USB 3.0 ports on the Raspberry Pi 5, essential for connectivity.
- Feso'ota'i le Malosiaga: Connect the recommended Raspberry Pi 27W USB-C Power Supply to the USB-C power input port. The Raspberry Pi 5 features a PC-style power button for convenient power management.

Figure 3.2: The USB-C power input and the integrated power button, allowing for controlled power-on/off events.
- Malosiaga: Once all connections are secure, press the power button to boot your Raspberry Pi 5. The system will begin to load the operating system from the microSD card.
4. Fa'atonuga o Galuega
Once your Raspberry Pi 5 has successfully booted, you can begin using it:
- First Boot Configuration: On the first boot, Raspberry Pi OS will guide you through an initial setup wizard. This includes setting your country, language, timezone, creating a user account, and connecting to Wi-Fi.
- Desktop Environment: After setup, you will be presented with the Raspberry Pi OS desktop environment. You can navigate using the connected keyboard and mouse.
- Fa'afouga polokalame: It is highly recommended to update your system software regularly. Open a terminal (usually found in the Accessories menu) and run the following commands:
sudo apt update
sudo apt full-upgrade -y - Fa'aaogaina o le GPIO: The Raspberry Pi 5 features a 40-pin GPIO header for connecting various electronic components and HATs (Hardware Attached on Top). Refer to the official Raspberry Pi documentation for detailed pinout diagrams and programming guides.

Figure 4.1: The 40-pin GPIO header on the Raspberry Pi 5, providing extensive connectivity for custom projects and hardware.
- Tapuni i lalo: Always shut down your Raspberry Pi properly to prevent data corruption. You can do this via the desktop menu (Shutdown > Shutdown) or by using the command line:
sudo shutdown -h now
5. Vaega Autu
The Raspberry Pi 5 (16GB) offers a range of powerful features:
- Broadcom BCM2712 2.4GHz quad-core 64-bit Arm Cortex-A76 CPU, with cryptography extensions, 512KB per-core L2 caches and a 2MB shared L3 cache
- Dual-band 802.11ac Wi-Fi Bluetooth 5.0 / Bluetooth Low Energy (BLE)
- 2 × USB 3.0 ports, supporting simultaneous 5Gbps operation / 2 × USB 2.0 ports
- Gigabit Ethernet, with PoE+ support (requires separate PoE+ HAT)
- The Raspberry Pi 27W USB-C Power Supply is recommended for delivering the power you need to keep your Raspberry Pi running at peak performance
6. Fa'amatalaga
Detailed technical specifications for the Raspberry Pi 5 (16GB):
| Fa'aaliga | Taua |
|---|---|
| Fa'ailoga | Rasipi Pi |
| Igoa Fa'ata'ita'iga | Rasipi Pi 5 |
| Numera Fa'ata'ita'i Mea | SC1113 |
| Processor | Broadcom BCM2712 2.4GHz quad-core 64-bit Arm Cortex-A76 CPU |
| Numera o Processors | 4 |
| RAM | 16 GB DDR4 |
| Ituaiga uaealesi | Dual-band 802.11ac Wi-Fi, Bluetooth 5.0 / BLE |
| Taulaga USB | 2 × USB 3.0, 2 × USB 2.0 |
| Ethernet | Gigabit Ethernet (with PoE+ support) |
| Faiga Fa'atonu | Linux (Raspberry Pi OS recommended) |
| Fua o Mea | 3.55 x 2.76 x 1.18 inisi |
| Mea mamafa | 1.59 aunese |
| Muamua Aso Avanoa | Ianuari 10, 2025 |

Ata 6.1: O se i luga view of the Raspberry Pi 5 board, illustrating the arrangement of its various components and connectors.
7. Tausiga
Proper maintenance ensures the longevity and optimal performance of your Raspberry Pi 5:
- Malili: The Raspberry Pi 5 can generate significant heat under heavy load. Consider using an active cooling solution (e.g., a fan or heatsink) to prevent thermal throttling and ensure stable performance.
- Fa'amamaina: Periodically clean the board and any attached cooling solutions to remove dust buildup, which can impede airflow and heat dissipation. Use compressed air or a soft brush.
- Fa'afouga polokalame: Regularly update your Raspberry Pi OS and installed software packages to benefit from bug fixes, security patches, and new features. Use the
sudo apt updatemasudo apt full-upgradepoloaiga. - MicroSD Card Health: MicroSD cards have a limited number of write cycles. For applications requiring frequent writes, consider using a high-endurance microSD card or booting from an external SSD via USB 3.0 for improved reliability and speed.
8. Faʻafitauli
If you encounter issues with your Raspberry Pi 5, try the following troubleshooting steps:
- Leai se Malosi/Leai se Fa'a:
- Ensure you are using the recommended 27W USB-C power supply. Insufficient power is a common cause of issues.
- Check that the microSD card is properly inserted and contains a valid Raspberry Pi OS image.
- Verify that the power button has been pressed to initiate boot.
- Leai se Fa'aaliga Fa'aaliga:
- Confirm that the micro-HDMI cable is securely connected to both the Raspberry Pi and the display.
- Ensure your display is set to the correct input source.
- Try a different micro-HDMI port or cable.
- Fa'afitauli Feso'ota'i Feso'otaiga:
- For wired connections, check the Ethernet cable and router status lights.
- For Wi-Fi, ensure the correct network name (SSID) and password are entered during setup.
- Verify that Wi-Fi is enabled in the Raspberry Pi OS settings.
- Ova le vevela:
- If the board feels excessively hot or performance degrades, ensure adequate ventilation.
- Install a heatsink and/or fan for improved thermal management.
9. Fa'amatalaga Saogalemu
Please observe the following safety guidelines when using your Raspberry Pi 5:
- Paoa sapalai: Only use the recommended 27W USB-C power supply or a high-quality, compliant 5V/5A USB-C power supply. Using an inadequate power supply can lead to instability or damage.
- Taulimaina: Handle the Raspberry Pi 5 board by its edges to avoid touching components, especially when powered on. Static electricity can damage sensitive electronics.
- Siosiomaga: Operate the Raspberry Pi 5 in a well-ventilated area. Avoid exposing it to extreme temperatures, humidity, or direct sunlight. Keep it away from liquids and conductive materials.
- Suiga: Do not attempt to modify the hardware of the Raspberry Pi 5 beyond its intended use (e.g., connecting HATs or peripherals). Unauthorized modifications may void your warranty and pose safety risks.
10. Fa'amaonia ma Lagolago
The Raspberry Pi 5 (16GB) comes with a standard manufacturer's warranty. For specific warranty terms and conditions, please refer to the official Raspberry Pi web'upega tafaʻilagi pe faʻafesoʻotaʻi lau nofoaga e faʻatau ai.
For technical support, documentation, community forums, and additional resources, please visit the official Raspberry Pi webnofoaga: www.raspberrypi.com.