1. Folasaga
This user manual provides detailed instructions for the Huacaoe WiFi Smart Relay Switch Module, Model TYWB 4ch-RF. This 4-channel wireless relay controller is designed for smart home automation, allowing remote control of appliances and devices via the Smart Life or Tuya mobile applications. It supports various input voltages and offers multiple operating modes, including compatibility with voice assistants like Amazon Alexa and Google Home.
2. Fa'amatalaga Saogalemu
Please read all safety instructions carefully before installing or operating this device. Failure to follow these instructions may result in electric shock, fire, or other hazards.
- Saogalemu Faaeletise: Installation should only be performed by qualified personnel. Ensure power is disconnected before any wiring.
- Voltagu Fesoasoani: Faamaonia o le voltage (USB 5V or DC 7-32V) matches your power source.
- Gafatia o uta: Do not exceed the maximum cutover current of 10A or cutover voltage of 250V per relay. The total load should not exceed 16A.
- Siosiomaga: Operate the device within the specified working temperature (-40 to 70 degrees Celsius) and humidity (40% to 80% RH) ranges.
- Feso'ota'iga mago: This is a clean dry contact relay. There is no voltage on the output terminals. An external power source is required for the load.
- Fa'ailoga: Note that this product may not be UL, CSA, or ETL marked. Consider this for professional installations.
3. Mea i totonu o le afifi
Upon opening the package, please verify that all items are present and undamaged.
- 1 x Huacaoe 4-Channel WiFi Smart Relay Switch Module (Model TYWB 4ch-RF)
- 1 x Fa'atonuga Tusi Taiala (lenei pepa)
- 1 x External Switch Pin Harness
4. Oloa Ua Ovaview
Familiarize yourself with the components and layout of the Huacaoe WiFi Smart Relay Switch Module.

Ata 4.1: Luma view of the Huacaoe WiFi Smart Relay Switch Module (Model TYWB 4ch-RF) and its external switch pin harness. The module features input terminals, relay output terminals, manual control buttons (K1-K4), a reset button, and a network indicator.
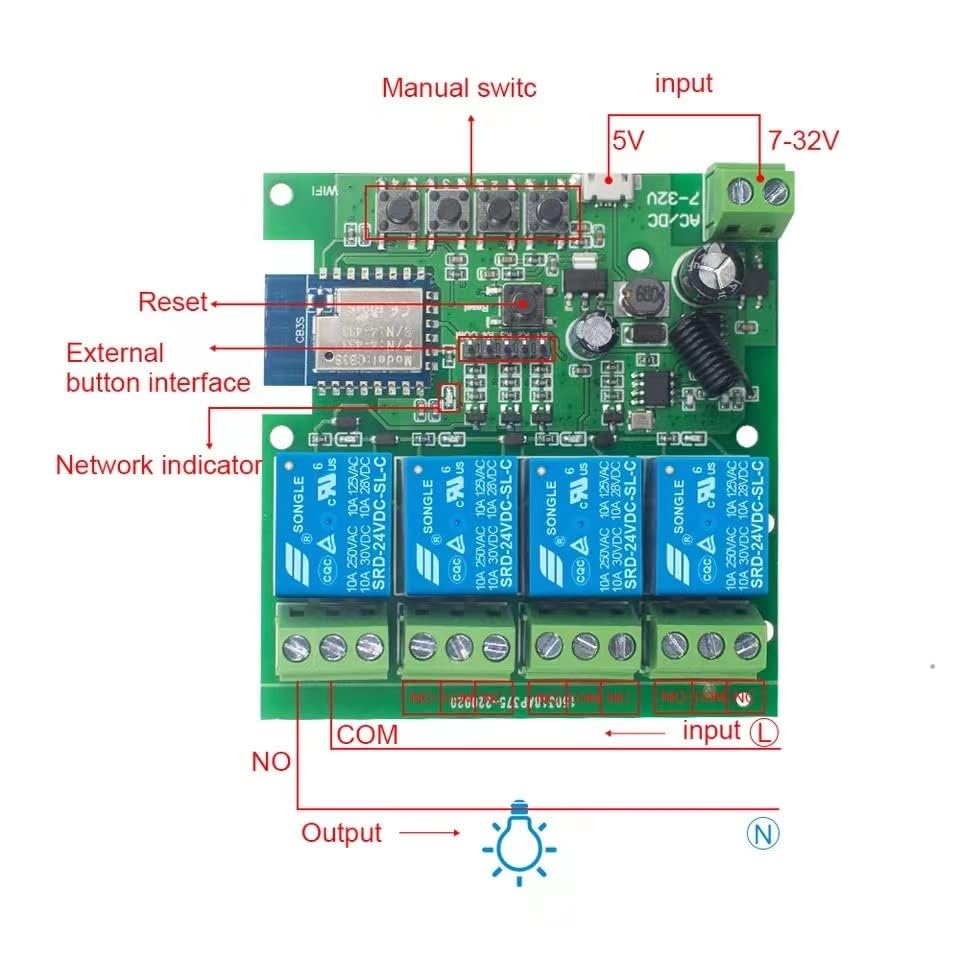
Ata 4.2: Totonu view and basic wiring diagram. This image highlights the manual switches, reset button, external button interface, network indicator, 5V and 7-32V input options, and the COM/NO output terminals for each relay.
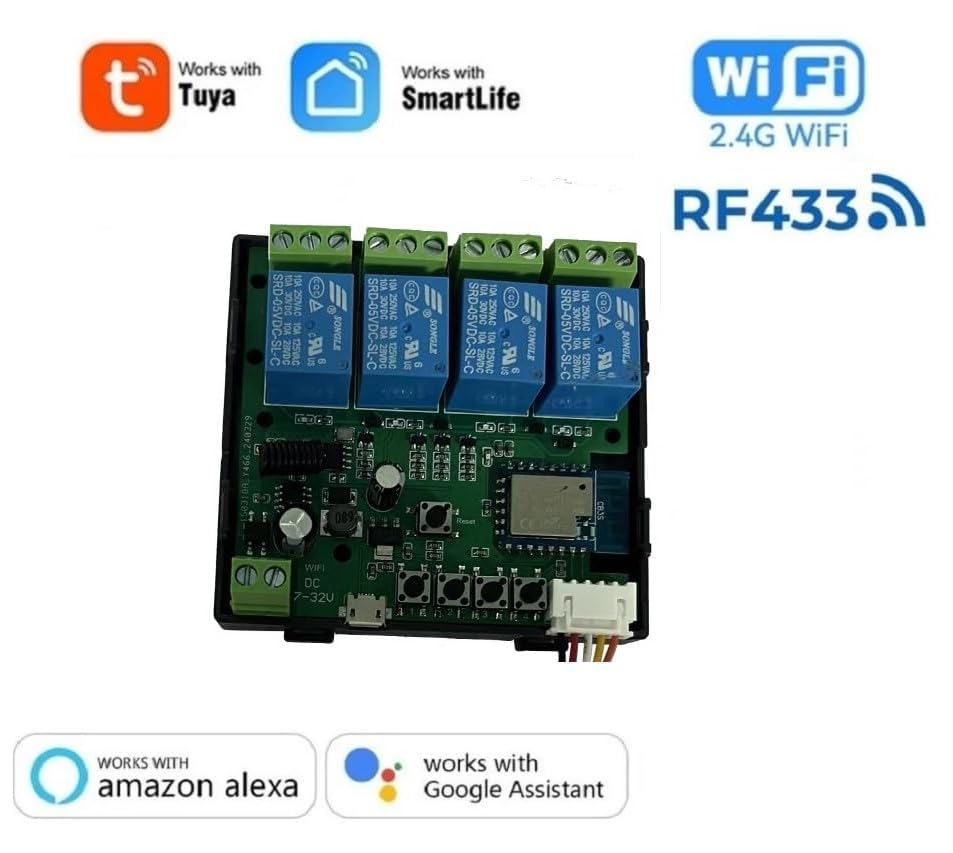
Ata 4.3: The module supports Tuya and SmartLife applications, operates on 2.4G WiFi, includes RF433MHz functionality, and is compatible with Amazon Alexa and Google Assistant for voice control.
Ata 4.4: A simplified wiring diagram illustrating the connections for input power (5V or 7-32V), external button interface, manual switches, reset button, network indicator, and the dry contact output terminals (NO, COM) for connecting a load, such as a light bulb.
5. Fa'amatalaga
| Fa'ata'ita'iga | TYWB 4ch-RF |
| Sao Voltage | USB 5V or DC 7-32V |
| Fa'aaogāga Malosiaga | <1W |
| Fa'anofo filemu | 80mA |
| Cutover Current (Max) | 10A per channel, 16A total |
| Cutover Voltage (Max) | 250V |
| Relay Model | 10A Relay |
| Galulue Vevela | -40 i le 70 tikeri Celsius |
| Susū Galuega | 40% i le 80% RH |
| Feso'ota'iga uaealesi | 2.4GHz WiFi (b/g/n), Bluetooth, RF433MHz |
| Fua | 3.88 x 3.19 x 0.98 inisi (9.85 x 8.1 x 2.49 cm) |
| mamafa | 4.16 aunese (118 kalama) |
| Ituaiga Fa'amau | DIN Rail (with ABS Shell) |
6. Seti
6.1 Malosiina o le Masini
The module can be powered using either a USB 5V power source or a DC 7-32V power supply connected to the input terminals.
- Connect your chosen power source to the appropriate input terminals (USB 5V port or DC 7-32V screw terminals).
- Once powered, the device will enter pairing mode, indicated by the network indicator light.
6.2 App Installation and Network Configuration
The Huacaoe Smart Relay Module operates with the Smart Life or Tuya Smart application.
- Download the "Smart Life" or "Tuya Smart" app from your mobile device's app store (available for iOS and Android).
- Resitala pe saini i lau teugatupe.
- Ensure your mobile device's Bluetooth is enabled and it is connected to a 2.4GHz WiFi network. The module only supports 2.4GHz WiFi.
- Open the app. The device should be automatically discovered. If not, tap the "+" icon to add a device and select "Auto Scan" or manually add a "Switch (Wi-Fi)".
- Follow the on-screen prompts to enter your 2.4GHz WiFi network password.
- The device will connect to your WiFi network. Once connected, the network indicator light will change status (e.g., solid blue).
Note: For environments without a continuous WiFi network, you can initially configure the device with 2.4G WiFi. After configuration, if the router settings are changed to block WiFi connectivity for the relay, you may still be able to use Bluetooth remote control if supported by the app and device.
7. Faiga Fa'atino
The module supports three primary operating modes, configurable independently for each of the four channels via the Smart Life/Tuya app.
7.1 Self-locking Latching Mode
In this mode, each relay acts as a standard on/off switch. Pressing the button (physical or in-app) toggles the relay's state.
- Turn on/off connected devices independently.
- The relay remains in its last state (on or off) until manually changed again.
7.2 Momentary Inching Mode
This mode is suitable for applications requiring a brief pulse of power, such as garage door openers or momentary button presses.
- When activated (via app or physical button), the relay will turn on for a set duration and then automatically turn off.
- The duration can be adjusted in the Smart Life/Tuya app, typically from 2 seconds to 1 minute.
7.3 Interlock Mode
Interlock mode ensures that only one relay can be active at a time. When one relay is turned on, all other relays in the interlock group are automatically turned off.
- Useful for applications where only one device should operate at a time, preventing conflicts.
8. Avatu Fa'apitoa
8.1 Fa'atulagaina ma Taimi
Automate your devices by setting schedules and timers within the Smart Life/Tuya app.
- Create single, repeat, circle, or countdown timers to automatically turn devices on or off at specified times.
- Timers can operate even if the network connection is temporarily unavailable.

Ata 8.1: Example of setting up a timing function in the Smart Life app to automate device operation.
8.2 Pulea leo
Integrate the module with Amazon Alexa or Google Home for convenient voice control of your connected devices.
- Link your Smart Life/Tuya account to your Alexa or Google Home app.
- Su'e masini.
- Faaaoga poloaiga leo e pei o:
- "Alexa, turn on the light."
- "Hey Google, turn off the bedroom light."

Ata 8.2: The module supports voice control through Amazon Alexa and Google Home, allowing hands-free operation.
8.3 Family Sharing
Share control of your smart devices with family members through the Smart Life/Tuya app.
- In the app, navigate to the device settings and select "Share Device" or "Family Management".
- Invite family members to control the module, enabling collaborative smart home management.

Ata 8.3: The family sharing function in the Smart Life app allows multiple users to control the smart relay module.
8.4 External Switch Pin Interface
The module includes an external switch pin interface, allowing for local control using momentary dry contacts. This is useful for integrating with microcontrollers or traditional wall switches.
- Connect external momentary switches to the provided harness and interface pins.
- These external inputs can trigger relays based on sensors or other digital inputs, providing a local override or additional control method.
9. Fa'apipi'i
The Huacaoe WiFi Smart Relay Switch Module is designed for easy installation, particularly with its DIN rail mountable ABS shell.
- Fa'amauina: Secure the module to a DIN rail within an appropriate electrical enclosure.
- Ulufale uaea: Connect the power supply (USB 5V or DC 7-32V) to the designated input terminals.
- Uea Fausia: Connect the devices you wish to control to the relay output terminals (NO and COM). Remember that these are dry contacts, so the load requires its own power source. For example, to control a light, connect the light's power line through the NO and COM terminals of a relay.
- External Switches (Optional): If using external switches, connect them to the external switch pin interface using the provided harness.
- Siaki Saogalemu: Double-check all wiring connections before restoring power. Ensure no bare wires are exposed.

Ata 9.1: The module features an ABS shell designed for DIN rail mounting, facilitating neat and secure installation within electrical panels or enclosures.
Ata 9.2: A detailed diagram showing the connection points for input power, external buttons, and the dry contact relay outputs (NO, COM) for controlling a load.
10. Faʻafitauli
| Fa'afitauli | Mafuaaga e ono tupu | Fofo |
|---|---|---|
| Ua le ola le masini. | Le sa'o voltage input or no power. | Verify power supply (USB 5V or DC 7-32V) is connected correctly and providing power. Check wiring. |
| E le mafai ona feso'ota'i i le WiFi. | Incorrect WiFi band (not 2.4GHz), wrong password, or weak signal. | Ensure your router is broadcasting a 2.4GHz network. Re-enter WiFi password carefully. Move the module closer to the router. Reset the module and try pairing again. |
| Relay not responding to app/voice commands. | No network connection, app issue, or incorrect mode setting. | Check network indicator light. Ensure the app is connected to the internet. Verify the relay mode (self-locking, momentary, interlock) is set correctly in the app. Try manual control via physical buttons. |
| Connected device not turning on/off. | Incorrect wiring of the load, load power issue, or exceeding relay capacity. | Ensure the load has its own power supply and is correctly wired to the NO and COM terminals. Check the load's functionality independently. Verify the load's current and voltage do not exceed the relay's specifications. |
| E le aoga le pulea o leo. | Incorrect linking with Alexa/Google Home, device not discovered, or incorrect commands. | Ensure your Smart Life/Tuya account is correctly linked to your voice assistant app. Redo device discovery. Use precise voice commands as configured. |
11. Tausiga
The Huacaoe WiFi Smart Relay Switch Module requires minimal maintenance.
- Fa'amamaina: Faaaoga se ie mago ma vaivai e faamama ai le masini. Aua le faaaogaina ni vailaau faamama po o ni vailaau fa'amama.
- Faʻalauiloa Firmware: Periodically check the Smart Life/Tuya app for available firmware updates to ensure optimal performance and security.
- Tulaga Siosiomaga: Ensure the device remains within its specified operating temperature and humidity ranges to prolong its lifespan.
12. Fa'amaonia ma Lagolago
For warranty information and technical support, please refer to the documentation provided at the point of purchase or contact Huacaoe customer service.
Manufacturer: Huacaoe Technologies Ltd.