1. Folasaga
This manual provides detailed instructions for the installation, operation, and maintenance of your Huacaoe Zigbee 4-Channel Temperature Monitoring Smart Relay Module. This device allows for remote control and temperature monitoring of up to four electrical appliances via the Tuya Smart Life app, with integrated Zigbee connectivity and a waterproof temperature sensor.
2. Fa'amatalaga Saogalemu
- Ensure the power supply is disconnected before any wiring or installation procedures.
- Do not exceed the maximum load current of 10A per channel or 16A total for all four channels. For high-power appliances or generators, use an external contactor.
- Operate the device within the specified working temperature (-40°C to 80°C) and humidity (5% to 90% RH) ranges.
- This device requires a Tuya Zigbee hub for full functionality.
- Keep the device away from water and extreme temperatures, except for the waterproof sensor probe.
3. Mea i totonu o le afifi
- 1 x Huacaoe Zigbee 4-Channel Smart Relay Module
- 1 x 1-meter DS18B20 Waterproof Temperature Sensor
- 1 x Tusi Fa'aoga
4. Oloa Ua Ovaview
The Huacaoe Zigbee 4-Channel Smart Relay Module is designed for intelligent control and monitoring. It features four independent dry contact relays and a dedicated input for a DS18B20 temperature sensor.

Image 1: Huacaoe Zigbee 4-Channel Smart Relay Module and DS18B20 Temperature Sensor.
4.1 Fa'amatalaga Fa'asinomaga
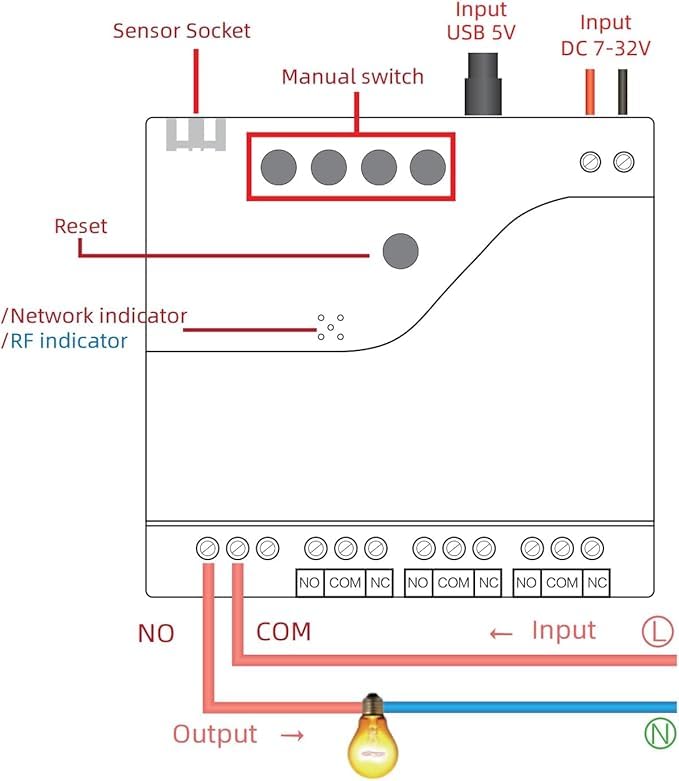
Image 2: Labeled diagram of the relay module showing sensor socket, manual switches, reset button, indicators, and input/output terminals.
- Sensor Socket: Connects the DS18B20 temperature sensor.
- Manual Switches (K1-K4): Control each relay channel manually.
- Toe Seti ki: E fa'aaogaina mo le fa'apipi'iina ma le toe setiina o le masini.
- Fa'ailoga feso'ota'iga: Shows Zigbee network status.
- Fa'ailoga RF: Shows 433Mhz RF status.
- Fa'aofi le USB 5V: Alternative power input via Micro USB.
- Input DC 7-32V: Main power input for the module.
- Output Terminals (NO, COM, NC): Dry contact relay outputs for connecting appliances.
5. Fa'amatalaga
| Fa'aaliga | Fa'amatalaga |
|---|---|
| Numera Fa'ata'ita'i | TYZGTH4CH-B1RF |
| Malosiaga Tuuina atu | USB 5V or DC 7-32V |
| Fa'aaogāga Malosiaga | <1W (Tafe filemu: 80mA) |
| Relay Cutover Current | <10A/Channel, Total <16A (for 4 channels) |
| Galulue Vevela | -40°C i le 80°C |
| Susū Galuega | 5% i le 90% RH |
| Faʻasalalauga Lelei | Zigbee 3.0 |
| Mea | RF-ABS |
| Fua | 2.95 x 2.87 x 0.79 inisi |
| Ituaiga Feso'ota'i Tulaga | Dry Contact (voltage-sa'oloto) |
| Temperature Sensor | DS18B20 Waterproof Probe (Stainless Steel) |
| Sensor Measuring Range | -40°C i le 80°C |
| Sensor Operating Voltage | 3.0-5.5V |
| Umia Uaea Sensori | 1 meter (extendable up to 5m) |
6. Fa'atonu Fa'atonu
6.1 So'oga Tulaga Malosi
The module can be powered by either a USB 5V source or a DC 7-32V source. Connect the appropriate power supply to the designated input terminals.
6.2 Temperature Sensor Connection
Connect the included DS18B20 waterproof temperature sensor to the dedicated sensor socket on the module. Ensure a secure connection.
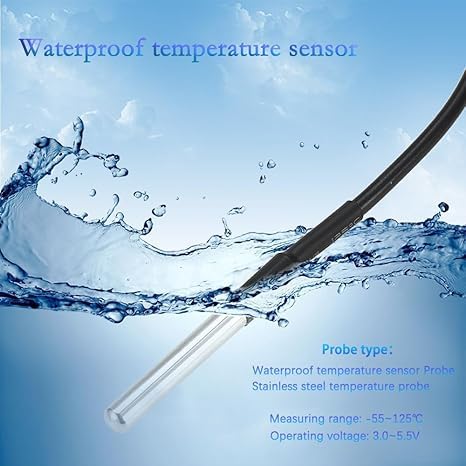
Image 3: The waterproof DS18B20 temperature sensor probe.
6.3 Appliance Wiring (Dry Contact)
The module provides dry contact outputs (NO, COM, NC) for each of its four channels. This means the relay acts as a switch without providing voltage. You will need to wire your appliance's power circuit through the relay contacts.
- E masani ona tatala (LEAI): The circuit is open (off) when the relay is de-energized and closed (on) when energized.
- Common (COM): O le vaega autū masani mo le relay.
- Normally Closed (NC): The circuit is closed (on) when the relay is de-energized and open (off) when energized.
Connect one side of your appliance's power line to the COM terminal and the other side to either the NO or NC terminal, depending on your desired default state.
6.4 Tuya Smart Life App Installation
- La'u mai le Tuya Smart Life polokalama mai le faleoloa polokalama a lau telefonipoto (iOS po'o le Android).
- Resitala pe saini i lau teugatupe.
6.5 Pairing with Tuya Zigbee Hub
This device operates on the Zigbee 3.0 protocol and requires a Tuya Zigbee hub for network connectivity and smart features. Ensure your Tuya Zigbee hub is already set up and online.
- Power on the Huacaoe Smart Relay Module.
- Open the Tuya Smart Life app and navigate to your Zigbee hub.
- Select "Add sub-device" or similar option within the hub's settings.
- Press and hold the Reset button on the Huacaoe module until the network indicator blinks rapidly, indicating pairing mode.
- The app should discover the device. Follow the on-screen prompts to complete the pairing process.
- For best results, perform the pairing process with the module close to your Tuya Zigbee hub.
7. Fa'atonuga o Galuega
Once paired, you can control and monitor the module using the Tuya Smart Life app.
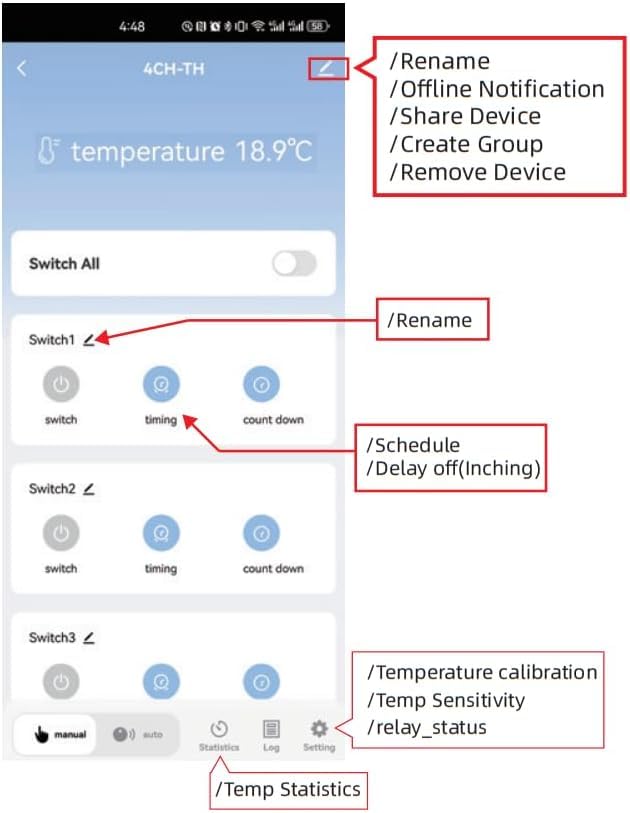
Image 4: Tuya Smart Life app interface for the 4-channel relay module, showing controls and settings.
7.1 Remote ON/OFF Control
In the Tuya Smart Life app, you can individually or collectively turn the four connected devices ON or OFF from anywhere with an internet connection.
7.2 Mata'ituina o le vevela
The app displays real-time temperature readings from the connected DS18B20 sensor. You can switch between Celsius (℃) and Fahrenheit (℉) units. The app also provides temperature statistics per day/month/year.
7.3 Automatic Temperature Control
Set temperature thresholds in the app to automate the control of your appliances. The module can automatically turn devices ON/OFF based on the ambient temperature.

Ata 5: Esoample of automatic heating and cooling control based on temperature settings in the app.

Image 6: Intelligent control of a fish tank environment based on real-time temperature feedback.
7.4 Galuega Fa'atino Taimi
The app supports scheduled, countdown, and cycle timers to turn devices ON/OFF at specified times.

Image 7: Timing functions allow scheduling and countdown for connected devices.
7.5 Pulea leo
Integrate the module with Amazon Alexa for voice control. Once configured in the Tuya app, link it to your Alexa account to control devices with voice commands.
7.6 Fetufa'aiga o masini
You can share control of the device with family members through the Tuya Smart Life app, granting them permissions to operate the switch.
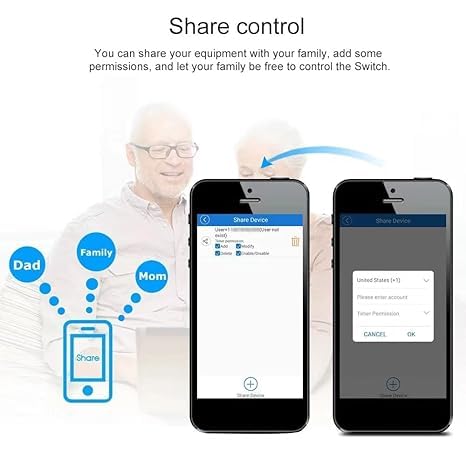
Image 8: Share control of the device with family members via the app.
7.7 Bluetooth and RF Functionality
The module includes extra Bluetooth and 433Mhz RF functions. If the device goes offline from the Zigbee network, you can still control it via Bluetooth using the Tuya app within available distance. It also supports fixed code 433Mhz RF.
8. Tausiga
- Keep the module clean and free from dust. Use a dry, soft cloth for cleaning.
- Regularly check wiring connections for security and integrity.
- Ensure the temperature sensor probe is clean for accurate readings.
9. Faʻafitauli
- E le o fa'apipi'i le masini: Ensure the module is close to your Tuya Zigbee hub during pairing. Confirm the hub is online and in pairing mode.
- Temperature not displaying in app: This module specifically supports Tuya Zigbee hubs. If paired with other brands' Zigbee gateways, temperature data may not display.
- Device unresponsive after power cycle: Some users have reported needing to press a button to reactivate the unit after a power outage. If this occurs, manually press one of the K1-K4 buttons or the reset button.
- E le fesuia'i le relay: Check power supply to the module and the appliance. Verify wiring connections. Ensure the load does not exceed 10A per channel.
- Faitauga sese o le vevela: Ensure the sensor probe is correctly connected and positioned in the area to be monitored.
10. Fa'amaonia ma Lagolago
For warranty information and technical support, please refer to the seller's contact information or the product listing on the platform where it was purchased. Keep your purchase receipt for warranty claims.