Folasaga
Thank you for choosing the Cuifati Mini Body Camera. This manual provides detailed instructions for the proper use, setup, and maintenance of your device. Please read this manual thoroughly before operating the camera to ensure optimal performance and longevity.
O mea o lo'o i totonu
- 1 x Wearable Camera
- 1 x Tausi Ato
- 1 x Tusi Fa'aoga
- 1 x Lanyard
- 1 x Back Shell Bracket
- 1 x Tripod
- 1 x USB Uaea
- 1 x Fa'amama Iefu

Figure 1: Cuifati Mini Body Camera and included accessories.

Figure 2: Multi-scenario application examples for the body camera.
Ua Umaview
Familiarize yourself with the components and controls of your Cuifati Mini Body Camera.
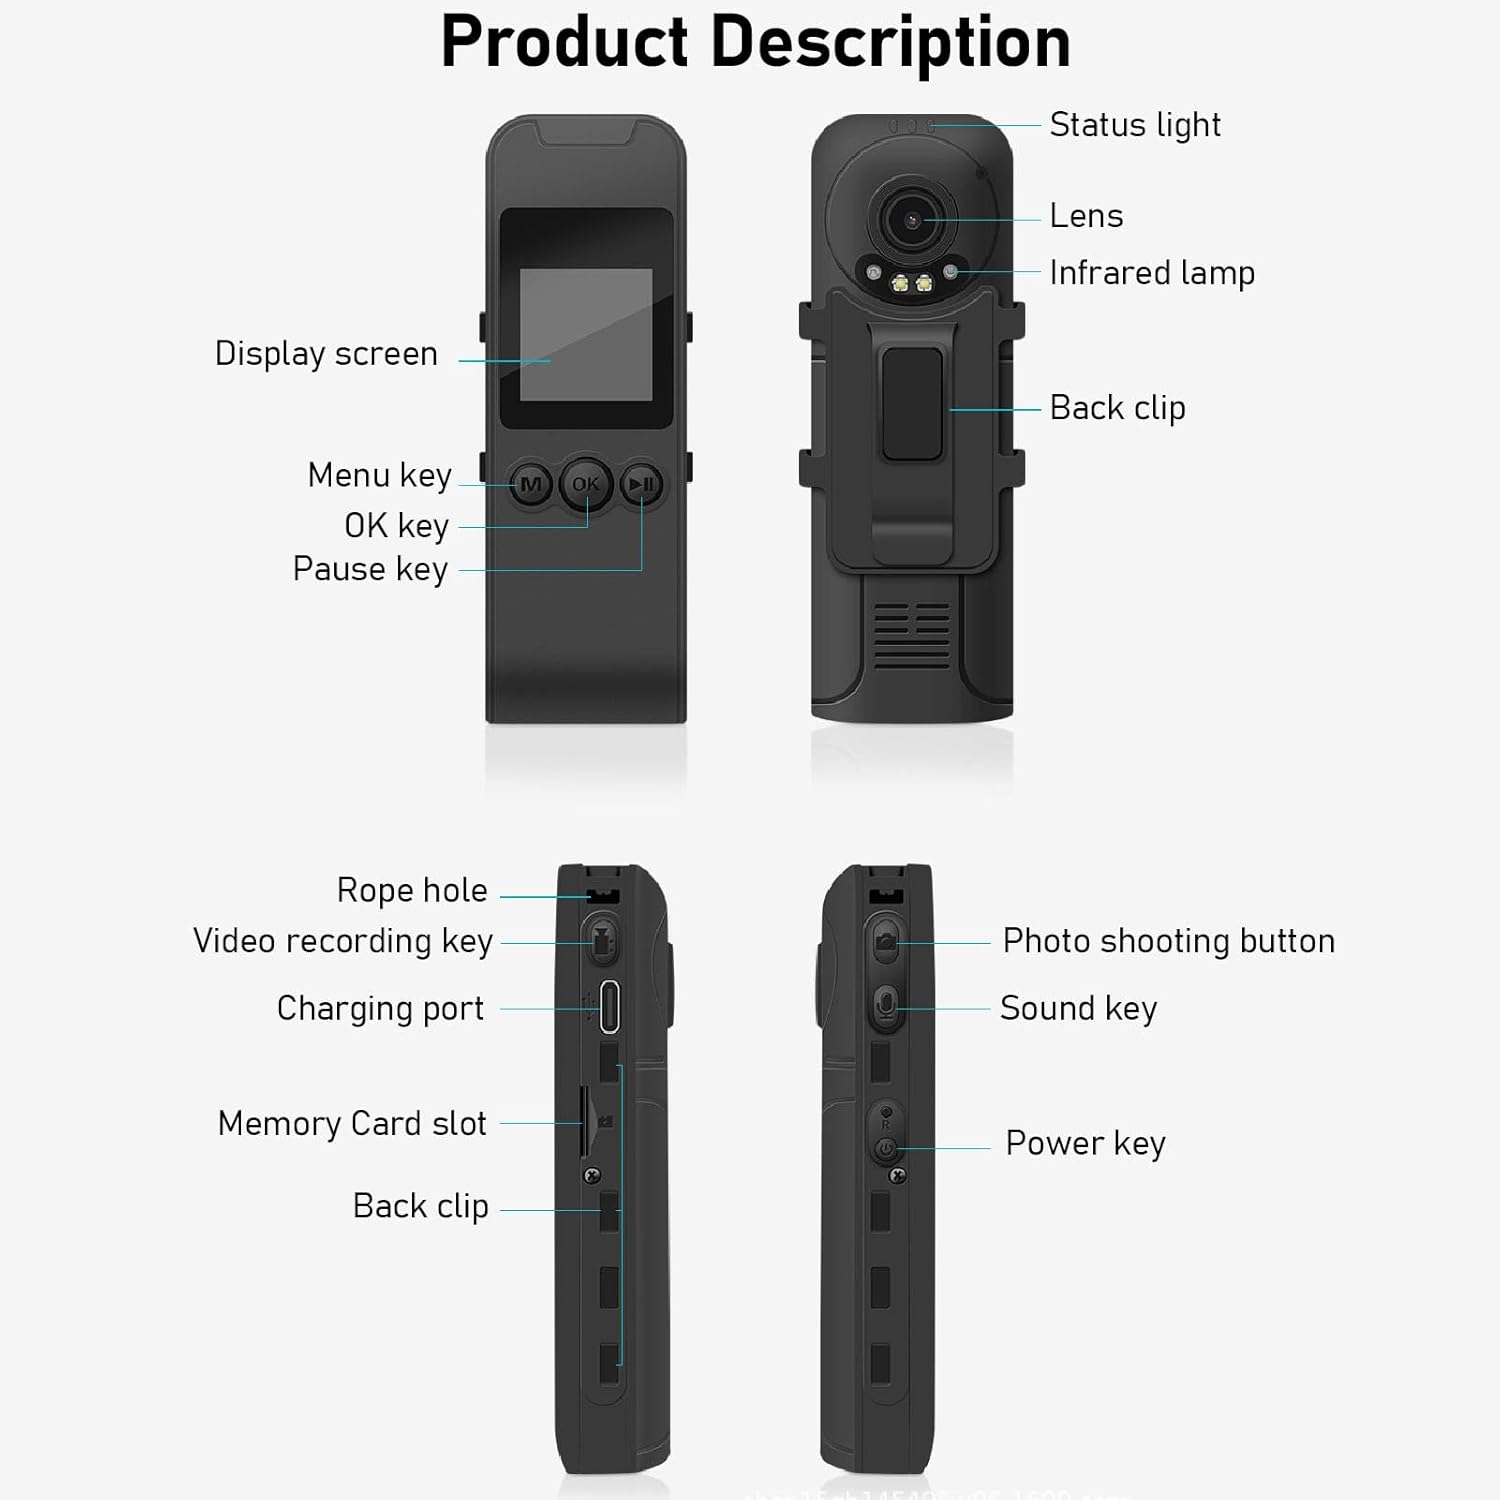
Figure 3: Labeled components of the Cuifati Mini Body Camera.
- Tulaga Malamalama: Indicates device status (e.g., recording, charging).
- Mata tioata: Main camera lens for video and photo capture.
- Infrared Lamp: Provides illumination for night vision.
- Kipi i tua: For attaching the camera to clothing or other surfaces.
- Fa'aaliga Mata: 1.3-inch LCD for live view, toe fa'afo'i, ma le fa'atonuga o le lisi.
- Menu Key (M): Accesses device settings.
- OK Ki: Confirms selections or starts/stops functions.
- Taofi Ki: Pauses playback or recording.
- Rope Hole: Attachment point for the lanyard.
- Video Recording Key: Amata ma taofi le pueina o vitio.
- Uafu e Fa'atumu ai Mea (Ituaiga-C): For charging the device and connecting to a computer.
- Slot Kata Fa'amanatu: Insert microSD card for storage.
- Photo Shooting Button: Pu'eina ata.
- Ki o le Leo: Controls audio recording.
- Ki Malosi: Ki'i pe tape le masini.
Seti
1. Totogiina le Maa
Before first use, fully charge the camera's built-in lithium-ion battery. Connect the camera to a power source using the provided Type-C USB cable. The status light will indicate charging status. A full charge provides approximately 20 hours of work time and 10 hours of video recording.
Figure 4: Built-in 1200mAh battery for extended use.
2. Fa'aofiina o se Kata Fa'amanatu
The camera supports up to a 256GB memory card (not included). Locate the memory card slot on the side of the camera. Gently insert the microSD card with the gold contacts facing down until it clicks into place. To remove, push the card in slightly until it springs out.

Figure 5: Memory card slot for storage expansion.
Fa'atonuga o Galuega
1. Malosi i luga/Pepe
- I le Malosiaga: Press and hold the Power Key until the display screen illuminates.
- Tape le Malosi: Press and hold the Power Key until the device shuts down.
2. Pueina Vitio
The camera records in 1440P HD at 30 frames per second with a 120° wide-angle lens and infrared night vision.
- E amata le pueina: Press the Video Recording Key. The status light will change, and a recording indicator will appear on the screen.
- Ia Taofi le pueina: Press the Video Recording Key again.
- Fa'amau Fa'amau: The camera supports loop recording, automatically overwriting the oldest files pe a tumu le kata manatua.
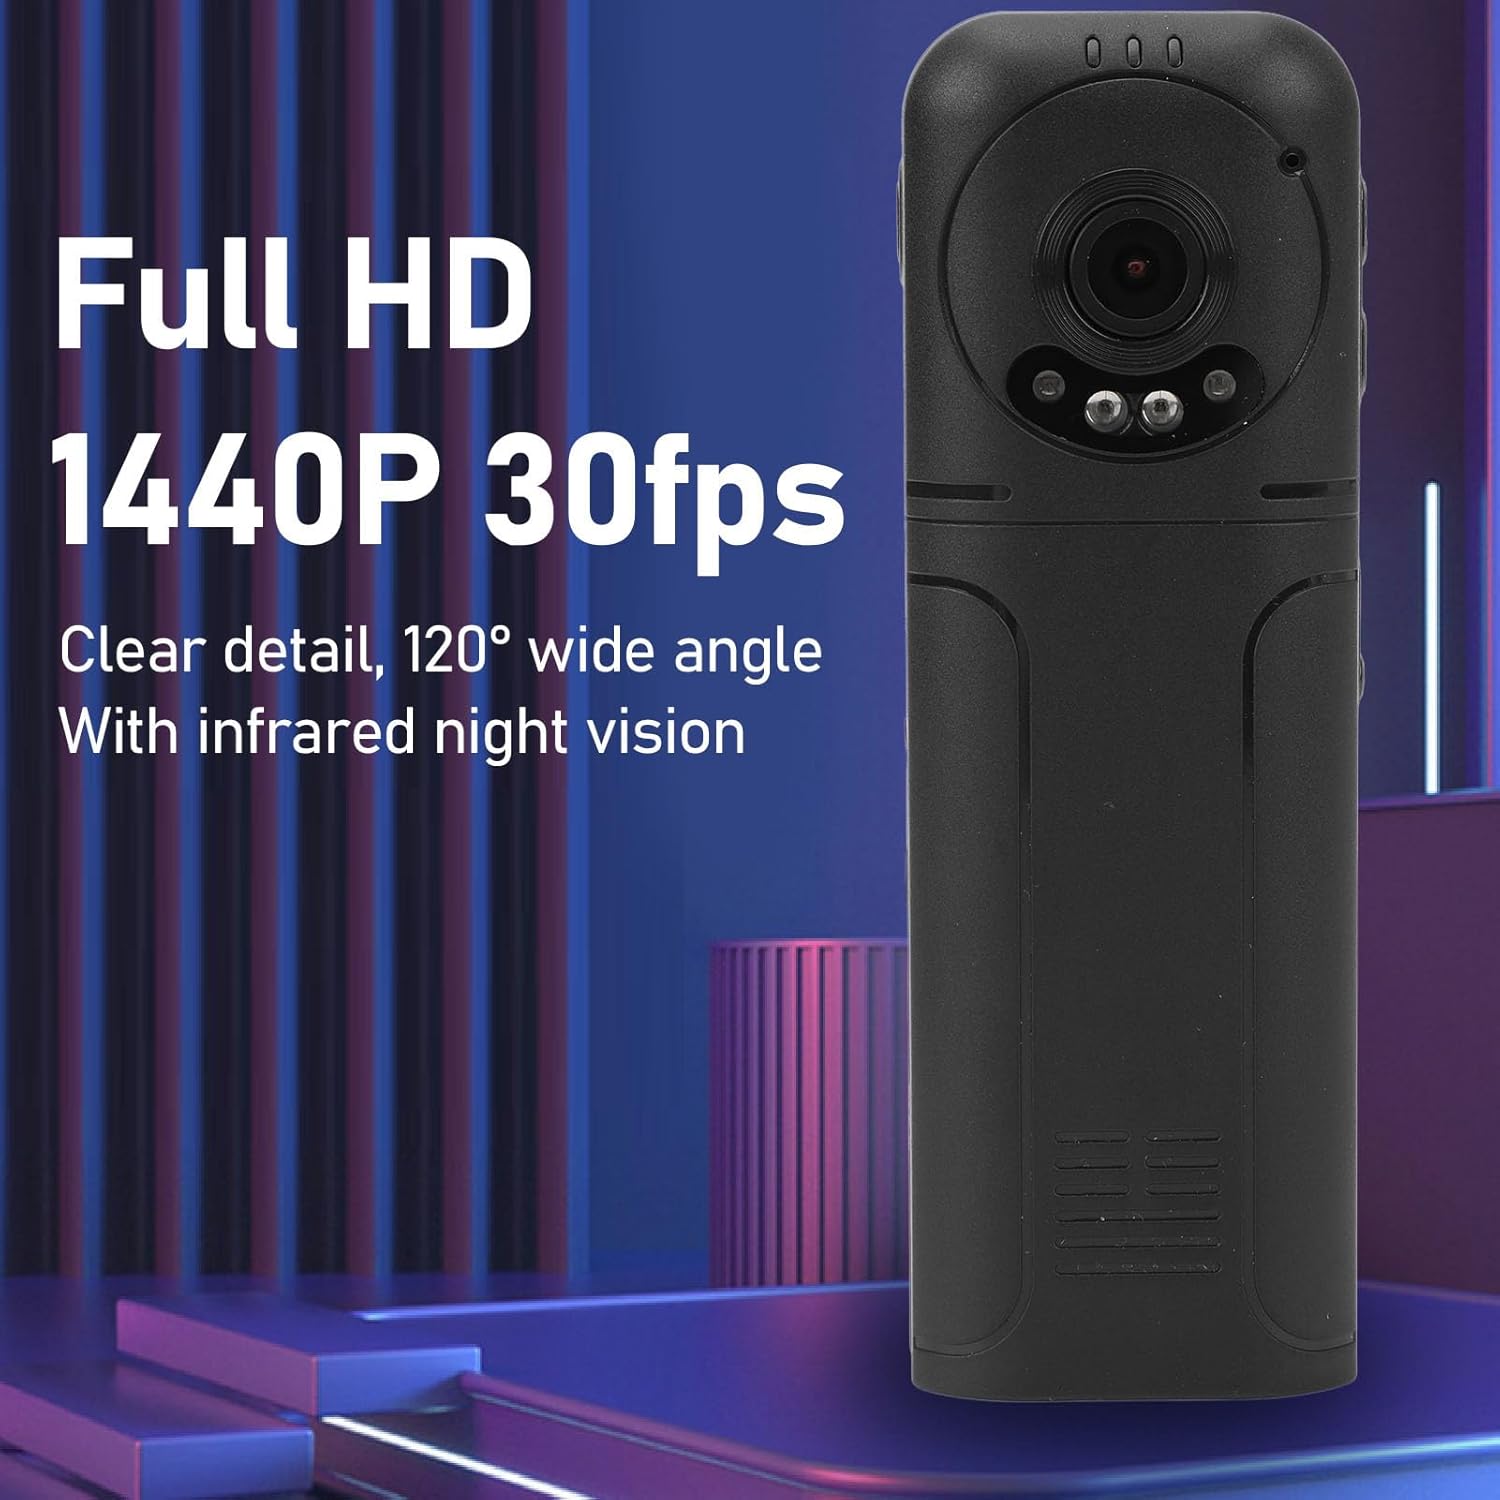
Figure 6: 1440P HD video recording with night vision.
3. Photo Taking
- E Pu'e se Ata: In standby mode, press the Photo Shooting Button.
4. Faʻalogo leo
- To Start Audio Recording: Press the Sound Key.
- To Stop Audio Recording: Press the Sound Key again.

Figure 7: Audio recording functionality.
5. Toe ta'alo ma File Pulega
The 1.3-inch LCD screen supports live playback, browsing, and pausing of videos, photos, and recordings directly on the device.

Figure 8: 1.3-inch color screen for on-device playback.
- Ta'aloga i luga o le masini: Use the Menu, OK, and Pause keys to navigate and play files i luga o le lau.
- Feso'ota'i ile komepiuta: Connect the camera to a computer via the Type-C USB cable to transfer, view, or delete files.
- OTG Function: If your mobile phone supports OTG, you can connect the camera directly to your phone for playback and file pulega.
Tausiga
1. Fa'amamaina
- Use the provided cleaning cloth or a soft, dry cloth to wipe the camera body and lens.
- Do not use liquid cleaners or solvents, as they may damage the device.
2. Teuina
- Teu le meapueata i se nofoaga mālūlū ma matutu mamao ese mai le susulu o le la ma le vevela tele.
- Remove the memory card if storing for extended periods.
Fa'afitauli
Afai e te feagai ma fa'afitauli i lau meapueata, va'ai i fa'afitauli masani nei ma fofo:
| Fa'afitauli | Fofo |
|---|---|
| E le ola le meapueata. | Ia mautinoa ua fa'atumuina le maa. Fa'afeso'ota'i i se punaoa eletise ma toe taumafai. |
| Cannot record video/photo. | Check if a memory card is inserted correctly and has sufficient free space. Format the memory card if necessary (this will erase all data). |
| E le o iloa le kata manatua. | Ensure the memory card is inserted correctly. Try a different compatible memory card. Format the card using the camera's menu or a computer. |
| Poor video/audio quality. | Ensure the lens is clean. Check lighting conditions. For audio, ensure the microphone is not obstructed. |
| E pipili pe lē tali mai le masini. | Press and hold the Power Key for 10-15 seconds to force a restart. |
Fa'amatalaga
Below are the technical specifications for the Cuifati Mini Body Camera (Model CUIFATI2vg0ri8moa):
- Ituaiga mea: Wearable Camera
- Mea: ABS
- Vaaiga i le po: 2pcs Night Vision Light Beads
- I'uga Vitio: 1440P (Maximum)
- Fua fua faatatau: 30FPS
- Ituaiga maa: Lithium Ion Battery
- Malosi maa: 1200mAh (Built-in)
- Lagolagosua mo le Teuina Maximum 256GB Memory Card (Not Included)
- Taulaga e Totogi: Ituaiga-C
- Igoa APP: For RoadCam (if applicable for advanced features)
- Igoa Fa'ata'ita'i: CUIFATI2vg0ri8moa
- Tufuga: CUIFATI
Fa'amaonia ma Lagolago
For warranty information or technical support, please refer to the documentation provided at the time of purchase or contact Cuifati customer service directly. Keep your purchase receipt as proof of purchase.