Folasaga
This manual provides detailed instructions for the My Pet Command Indoor Pet Barrier system, designed to help train your pets to avoid specific off-limit areas within your home. This system utilizes a barrier transmitter and a wireless collar (collar sold separately with kit or as an extra accessory) to create an adjustable boundary.

The My Pet Command Indoor Pet Barrier transmitter, a key component of the wireless pet containment system.
Vaega o oloa
Barrier Transmitter (MPC150 Xtra Barrier)
The main unit that creates the adjustable boundary.
The circular barrier transmitter unit, featuring a digital display and control buttons for setting the boundary range.
Collar (Sold Separately with Kit or as Extra)
The wireless, waterproof (IP54) collar worn by your pet. It receives signals from the barrier and delivers tone or static correction.
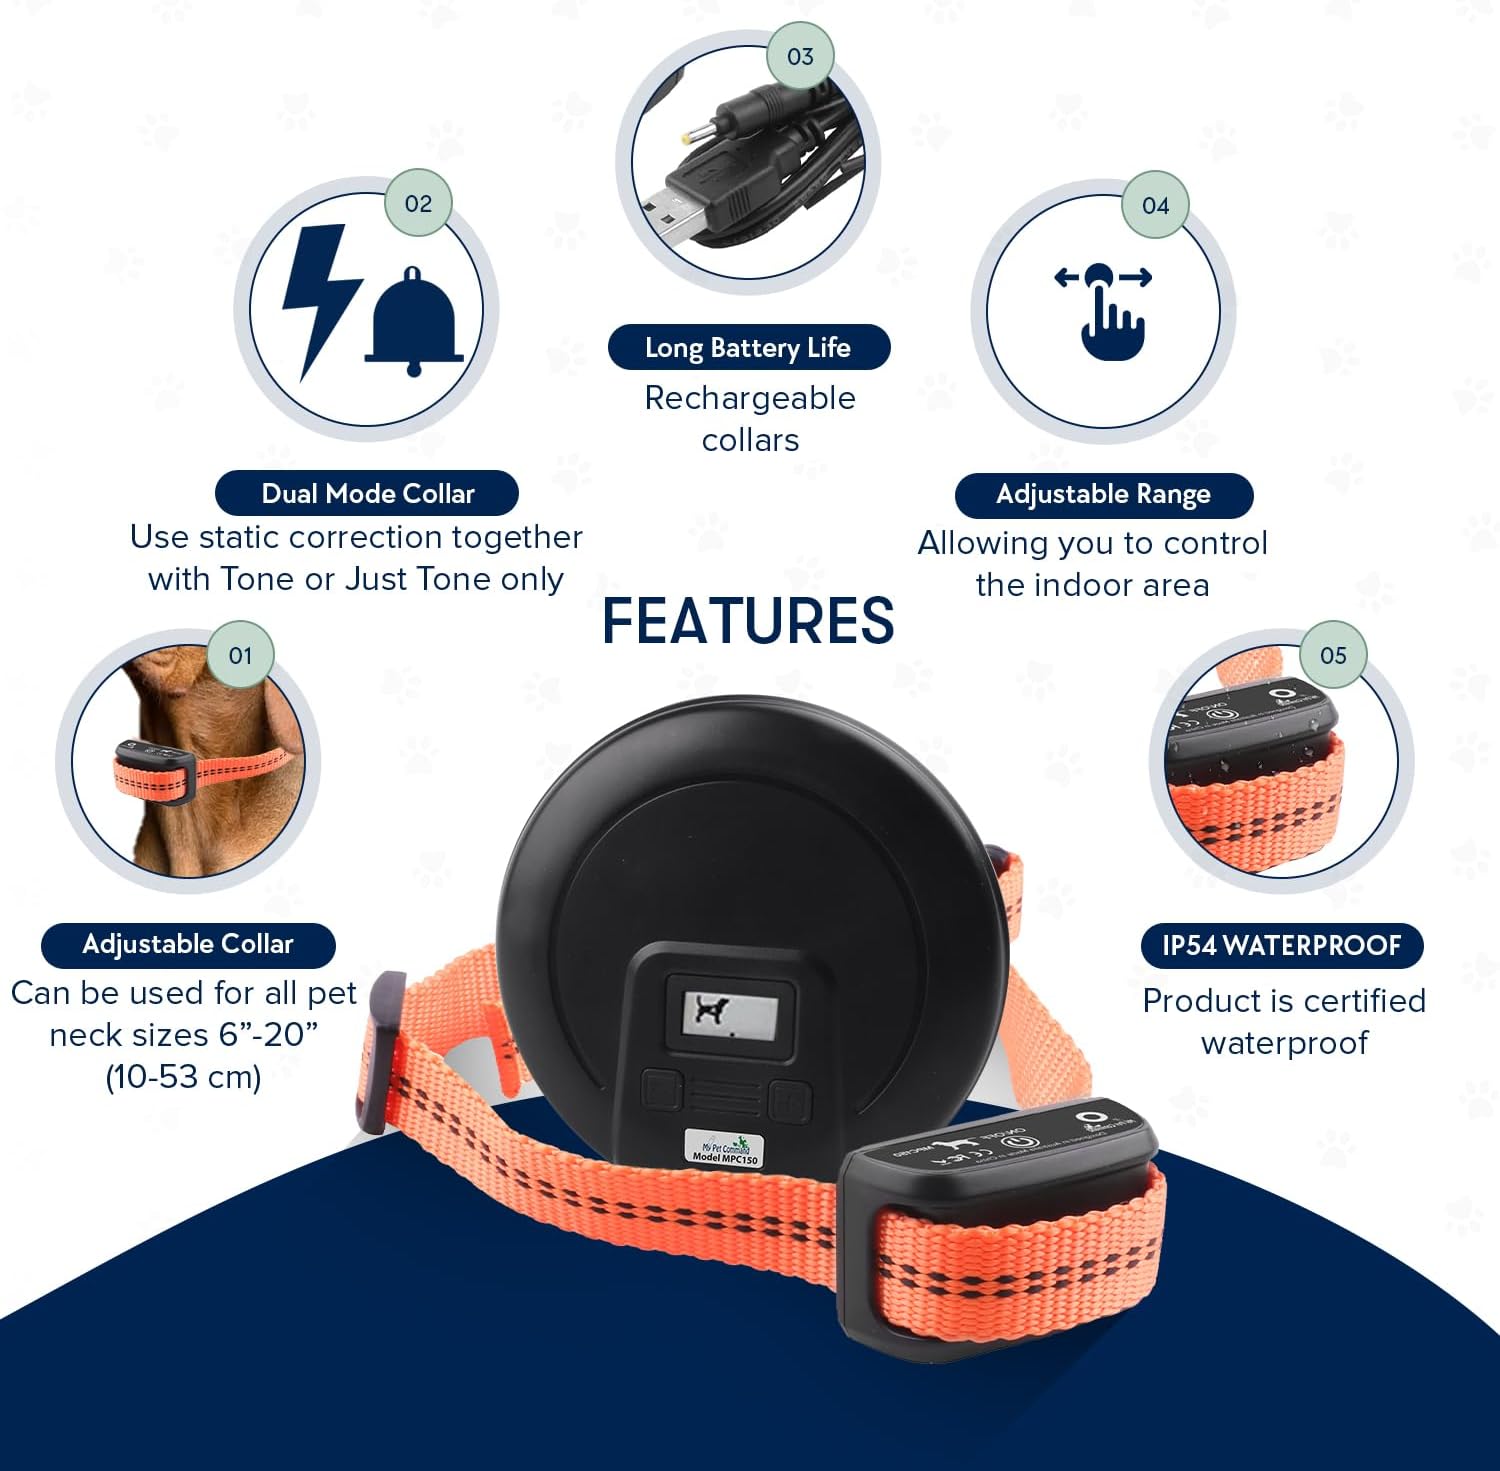
The orange pet collar with the attached receiver unit, which is rechargeable and waterproof.
Accessories (Included with Collar Kit)
- USB Totogi Uaea: For recharging the collar.
- Metal Prongs: Various sizes for different dog coat lengths.
- Silicone Covers: To be placed over metal prongs if static correction is not desired or for added comfort.
- Dog Whistle: For additional training purposes.
- Meafaigaluega Malamalama Su'ega: A clear plastic tool with a bulb to test static correction functionality.

A collection of accessories including the USB charging cable, different sized metal prongs, and a test light for the collar.
Seti Taiala
Powering the Barrier Transmitter
The barrier transmitter requires 3x AA batteries (not included). Use high-quality, non-rechargeable batteries for optimal performance. A fresh set of batteries can last up to 1.5 months if the unit is left on continuously.

The base of the barrier transmitter, indicating the location for AA battery installation.
Charging the Collar (for Collar Kit users)
The collar is rechargeable via the supplied USB cable. A fully charged collar can last 3-4 days if left on all the time. Connect the USB cable to the charging port on the collar and plug it into any standard USB power socket.
The collar's charging port, covered by a metal disc, which can be opened with a coin for USB cable connection.
Setting the Barrier Range
The barrier's range can be adjusted from approximately 1 to 8 feet. Use the '+' and '-' buttons on the transmitter to set the desired radius. The display will show the current range setting.

The barrier transmitter's display indicating the adjustable range, with plus and minus buttons for control.
Pairing Collars to the Barrier
The barrier supports multiple collars and offers three channels: A, B, or A+B. This allows for individual pet training or simultaneous control of multiple pets.
- Filifili Auala: On the back of the barrier transmitter, use the switch to select channel A, B, or A+B.
- Activate Barrier: Turn on the barrier transmitter by pressing the '+' button.
- Activate Collar: Press and hold the On/Off button on the collar until the indicator light turns on. The collar will automatically pair to the selected channel on the barrier.
- For Multiple Collars: To pair a second collar, ensure the first collar is paired and the barrier is on. Switch the channel on the barrier (e.g., from A to B). Then, turn on the second collar. It will pair to the new channel. To control both simultaneously, switch the barrier to A+B.

The channel selection switch on the back of the barrier transmitter, allowing selection of channel A, B, or both A+B for multi-pet use.
An instructional video demonstrating how to set up the barrier, adjust its range, and pair collars for effective pet training.
Faiga Fa'atino
The collar offers two operating modes:
Mode 1: Tone + Static Correction
In this mode, if your pet enters the set boundary, the collar will first emit a warning tone. If the pet does not leave the area, it will then deliver a static correction. This sequence may repeat up to three times before reverting to tone-only.
The collar unit with its metal contact points, used for delivering static correction in Mode 1.
Mode 2: Tone Only
In this mode, the collar will only emit a warning tone when your pet enters the boundary. No static correction will be delivered. This mode is ideal for sensitive pets or for initial training phases.
To switch between modes, briefly press the On/Off button on the collar. A single green blink every 5 seconds indicates Mode 1 (Tone + Static). Two green blinks every 5 seconds indicates Mode 2 (Tone Only).
The collar's indicator light, which blinks to show the current operating mode (single blink for Tone + Static, double blink for Tone Only).
Tausiga
Battery Replacement (Barrier)
Replace the 3x AA batteries in the barrier transmitter approximately every 1.5 months, or when the display indicates low power.
Collar Charging
Recharge the collar every 3-4 days if it's left on continuously. Ensure the charging port is securely covered after charging to maintain its IP54 waterproof rating.
Fa'amamaina
Wipe down the barrier and collar with a damp cloth as needed. Do not submerge the barrier in water.
Fa'afitauli
Collar Not Responding
- Check if the collar is charged and turned on.
- Ensure the barrier transmitter has fresh batteries and is turned on.
- Verify that the collar is paired to the correct channel (A, B, or A+B) on the barrier.
- Test the static correction using the provided test light tool.
Inconsistent Range
- Ensure the barrier transmitter is not placed on metal surfaces, as this can interfere with the radio signal.
- Adjust the range setting on the barrier transmitter.
- Obstacles like thick walls or large metal objects can affect the signal. Try repositioning the barrier.
Static Correction Not Working (if desired)
- Ensure the collar is in Mode 1 (Tone + Static Correction).
- Check that the metal prongs are making proper contact with your pet's skin. You may need to use longer prongs for pets with thick fur.
- If using silicone covers, ensure they are designed to allow static correction through, or remove them for full contact.
Fa'amatalaga o oloa
| Fa'aaliga | Fa'amatalaga |
|---|---|
| Numera Fa'ata'ita'i | MPC150 Xtra Barrier |
| Fa'ailoga | O La'u Fagafao Poloaiga |
| Mea mamafa | 9.3 aunese |
| Mea Tele (LxWxH) | 2.36 x 0.79 x 2.36 inisi |
| Barrier Power | 3x AA ma'a (E le'o aofia ai) |
| Collar Power | Rechargeable (USB Cable Included with Collar Kit) |
| Collar Waterproof Rating | IP54 |
| E mafai ona fetuunai | Approx. 1-8 feet |
| Correction Types | Tone, Static Correction |
| Tagata fa'atatau | Dogs (All Breeds) |
| Atunuu na Afua mai ai | Saina |
Fa'amaonia ma Lagolago
Fa'amatalaga Fa'amaonia
My Pet Command offers a 12-month manufacturer warranty. Please retain your proof of purchase.
Lagolago Tagata Fa'atau
For any issues or inquiries, please contact My Pet Command customer support:
- Phone: 888-686-6495 (USA)
- imeli: sales@mypetcommand.com

Contact details for My Pet Command customer support, including phone number and email address.