Folasaga
Thank you for choosing the Baseus Super Energy Pro 1600A Car Jump Starter. This device is designed to provide a reliable and powerful solution for starting vehicles with dead batteries, and also functions as a portable power bank. Please read this manual thoroughly before use to ensure safe and proper operation. Keep this manual for future reference.
Fa'amatalaga Saogalemu
- Always read the vehicle's owner's manual before attempting to jump start it.
- Aua le taumafai e oso e amata se maa aisa.
- Ia mautinoa e lelei le ea e fa'agaoioia pe a fa'aogaina le masini.
- Taofi le masini mai tamaiti ma fagafao.
- Do not expose the device to rain or extreme temperatures.
- Avoid short-circuiting the jumper clamps. Do not connect the red and black clamps faatasi.
- If the device or cables are damaged, do not use them. Contact support.
- Faʻafesoʻotaʻi i taimi uma le clamps to the correct battery terminals (red to positive, black to negative).
- Remove the jump starter immediately after the vehicle starts.
O mea o lo'o i totonu
Fa'amautinoa o lo'o iai mea uma i lau afifi:
- Baseus Super Energy Pro Car Jump Starter Unit
- Uaea So'a Atamai ma Clamps
- USB-C Uaea Fa'atau
- Tusi Lesona a le Tagata (lenei pepa)

Image: Contents of the Baseus Super Energy Pro Car Jump Starter package, showing the main unit, smart jumper cables, and a USB-C charging cable.
Ua Umaview
Familiarize yourself with the components of your Baseus Super Energy Pro Car Jump Starter:
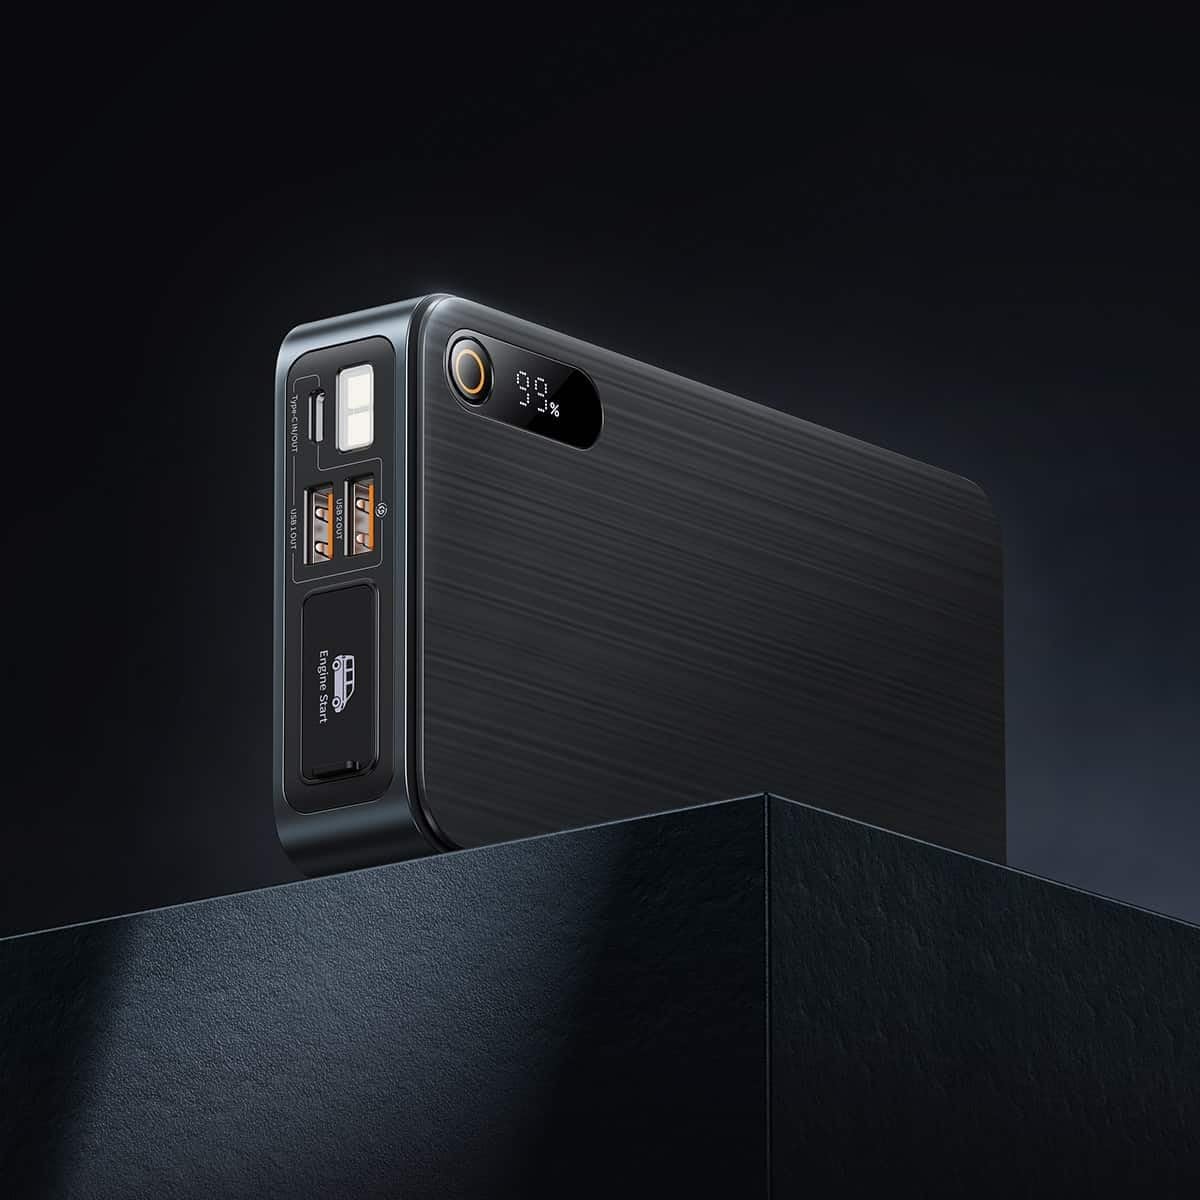
Image: Close-up of the jump starter's side panel, highlighting the various ports and the digital display.
- Faʻamatalaga Faʻaaliaina: Fa'aali atu le pasene maa o totoetage.
- Ki Malosi: Activates the device and turns on the LED light.
- USB-A Output Ports: For charging external devices like smartphones or tablets.
- Uafu Ulufale/Fa'asalalau Ituaiga-C: Used for charging the jump starter itself or charging other devices.
- Engine Start Port: Dedicated port for connecting the smart jumper cables.
- moliuila LED: Tuuina atu le malamalama i siosiomaga pogisa.

Image: The Baseus Super Energy Pro Car Jump Starter unit, displaying its digital battery indicator.
Totogiina le Masini
Before first use, fully charge the Baseus Super Energy Pro Car Jump Starter. It is recommended to keep the device charged above 50% for optimal performance and longevity.
- Connect the provided USB-C charging cable to the Type-C port on the jump starter.
- Connect the other end of the USB-C cable to a suitable USB power adapter (not included).
- The digital display will show the charging progress. The device is fully charged when the display shows 100%.
Setup for Jump Starting
Ensure your vehicle is in Park (P) or Neutral (N) and the parking brake is engaged. Turn off all vehicle accessories (headlights, radio, air conditioning).
- Ensure the jump starter has sufficient charge (at least 50%).
- Connect the blue end of the smart jumper cables into the Engine Start port on the jump starter. Ensure it is firmly seated.
Operating Instructions (Jump Starting)
Follow these steps carefully to jump start your vehicle:
- Faʻafesoʻotaʻi Red Clamp: Fa'apipi'i le mumu (+) clamp of the jumper cables to the positive (+) terminal of your vehicle's dead battery.
- Fesootai Black Clamp: Fa'apipi'i le uliuli (-) clamp of the jumper cables to the negative (-) terminal of your vehicle's dead battery.
- Fa'ailoga Siaki: Observe the indicator light on the smart jumper cable. A solid green light indicates a correct connection and that the device is ready to start. If it's red or flashing, check connections or refer to troubleshooting.
- Amata le Ta'avale: Once the indicator is green, start your vehicle's engine.
- Remove Jumper Cables: As soon as the engine starts, immediately remove the blue plug of the jumper cables from the jump starter.
- Momotu Clamps: Ona, motusia lea o le tapuni uliuli (-)amp mai le maa o le ta'avale, sosoo ai ma le moli mumu (+)amp.
Allow your vehicle's engine to run for at least 20-30 minutes to recharge its battery.
Tausiga
- Teuina: Store the jump starter in a cool, dry place, away from direct sunlight and moisture.
- Totogi: For optimal battery life, recharge the device every 3-6 months, even if not in use.
- Fa'amamaina: Fa'amamā le masini i se ie vaivai ma mago. Aua le fa'aaogaina ni vaila'au malolosi po'o ni mea e olo ai.
- Fa'ate'aina ma'a: Do not dispose of the device in household waste. Follow local regulations for proper disposal of lithium-ion batteries.
Fa'afitauli
| Fa'afitauli | Mafuaaga e ono tupu | Fofo |
|---|---|---|
| E le amata le taavale | E vaivai le maa fa'aoso oso. Le sa'o so'oga uaea. Ua matua faaleagaina lava maa taavale. | Toe fa'aola le oso oso. Siaki clamp connections to battery terminals. Consult a professional mechanic. |
| Jump starter not charging | Charging cable or adapter faulty. Type-C port damaged. | Fa'ata'ita'i se isi uaea USB-C ma fa'aoga eletise. Fa'afeso'ota'i le lagolago a tagata fa'atau. |
| Smart cable indicator is red/flashing | So'oga fa'afeagai polarity. Short circuit detected. Ova-vave/sili-voltage. | Momotu ma toe fa'afeso'ota'i clamps correctly (red to +, black to -). Ia mautinoa clampe lē pa'i le tasi i le isi. Disconnect and try again after a few minutes. If problem persists, contact support. |
Fa'amatalaga
| Fa'aaliga | Fa'amatalaga |
|---|---|
| Fa'ailoga | Baseus |
| Numera Fa'ata'ita'i | CGNL070001 |
| Tulaga maualuga i le taimi nei | 1600 A |
| Fa'atulagaina o le ma'a | Lithium-ion |
| Taavale Auaunaga Ituaiga | Ta'avale |
| Fua o Mea (L x W x H) | 10 x 5 x 1.27 cm |
| Mea mamafa | 920 g |
| Ulufale/Auga | USB-A Output, Type-C Input/Output |
Fa'amaonia ma Lagolago
For warranty information or technical support, please refer to the warranty card included with your product or contact the retailer where you purchased the device. You may also visit the official Baseus web'upega tafaʻilagi mo nisi fesoasoani ma faʻamatalaga faʻafesoʻotaʻi.