Folasaga
This manual provides detailed instructions for the installation, operation, maintenance, and troubleshooting of the HP ProDesk 400 G3 MS-7957 motherboard. Please read this manual thoroughly before proceeding with any installation or operation to ensure proper functionality and safety.
Fa'amatalaga Saogalemu
Ia matau i taimi uma puipuiga nei mo le saogalemu e puipuia ai le faaleagaina o le motherboard po o le manu'a ia te oe lava:
- Disconnect the power supply from the wall outlet before installing or removing any components.
- Fai se fusi tapulima e tetee atu i le pa'u po'o le pa'i soo i se mea u'amea fa'avae e fa'amalo ai le eletise a'o le'i tagofia le laupapa.
- Uu le motherboard i ona pito e aloese ai mai le pa'i i vaega maaleale.
- Ia mautinoa e lelei le ea i totonu o le pusa o le komepiuta e puipuia ai le soona vevela.
- Taofi le motherboard mai le susu ma le vevela tele.
Ua Umaview
The HP ProDesk 400 G3 MS-7957 is a MicroATX motherboard designed for Intel processors with an LGA 1151 socket. It supports DDR4 RAM and features a B250 chipset, offering a reliable foundation for desktop computing.
Vaega Autu
- Compatible CPU Brand: Intel
- Ituaiga Socket: LGA 1151/Socket H4
- Fa'ailoga Fa'ailoga: MicroATX
- Feso'ota'i I/O: Ethernet (RJ-45), USB 2.0, USB 3.0, VGA, DisplayPort, HD Audio Jack
Fa'ailoga Fa'ailoga
Familiarize yourself with the layout of the motherboard to facilitate proper installation and connection of components.

Ata 1: Fa'afagota view of the HP ProDesk 400 G3 MS-7957 motherboard. This image highlights the CPU socket (LGA 1151), four DDR4 RAM slots, PCIe slots, and various headers for front panel connections and storage devices.
Seti ma Fa'apipi'i
Ae e te le'i Amata
- Ensure your computer case is compatible with the MicroATX form factor.
- Gather all necessary components: CPU, RAM, CPU cooler, power supply, storage devices, and graphics card (if not using integrated graphics).
- Prepare your workspace by ensuring it is clean, well-lit, and static-free.
Fa'apipi'i Motherboard
- Install the CPU into the LGA 1151 socket. Carefully align the CPU with the socket's notch and gently lower it into place. Close the retention arm.
- Fa'apipi'i le thermal paste i le CPU ma fa'apipi'i le CPU cooler e tusa ai ma fa'atonuga a le kamupani na gaosia.
- Install the DDR4 RAM modules into the designated slots. Ensure they are fully seated until the clips lock into place.
- Mount the motherboard into the computer case using the appropriate standoffs and screws.
- Connect the main 24-pin ATX power connector and the 4-pin or 8-pin CPU power connector from your power supply to the motherboard.
- Install any expansion cards (e.g., graphics card) into the PCIe slots.

Ata 2: Fa'alava mai luga i lalo view of the HP ProDesk 400 G3 MS-7957 motherboard. This perspective provides a clear view of the processor socket, memory slots, and the layout of the various internal connectors and components.
Feso'ota'i Peripherals
- Connect SATA storage devices (HDDs/SSDs) to the SATA ports on the motherboard.
- Connect front panel headers (power button, reset button, USB ports, audio jacks) to their respective pins on the motherboard. Refer to your case manual for specific pin assignments.
- Connect external peripherals such as monitor, keyboard, mouse, and Ethernet cable to the rear I/O panel.
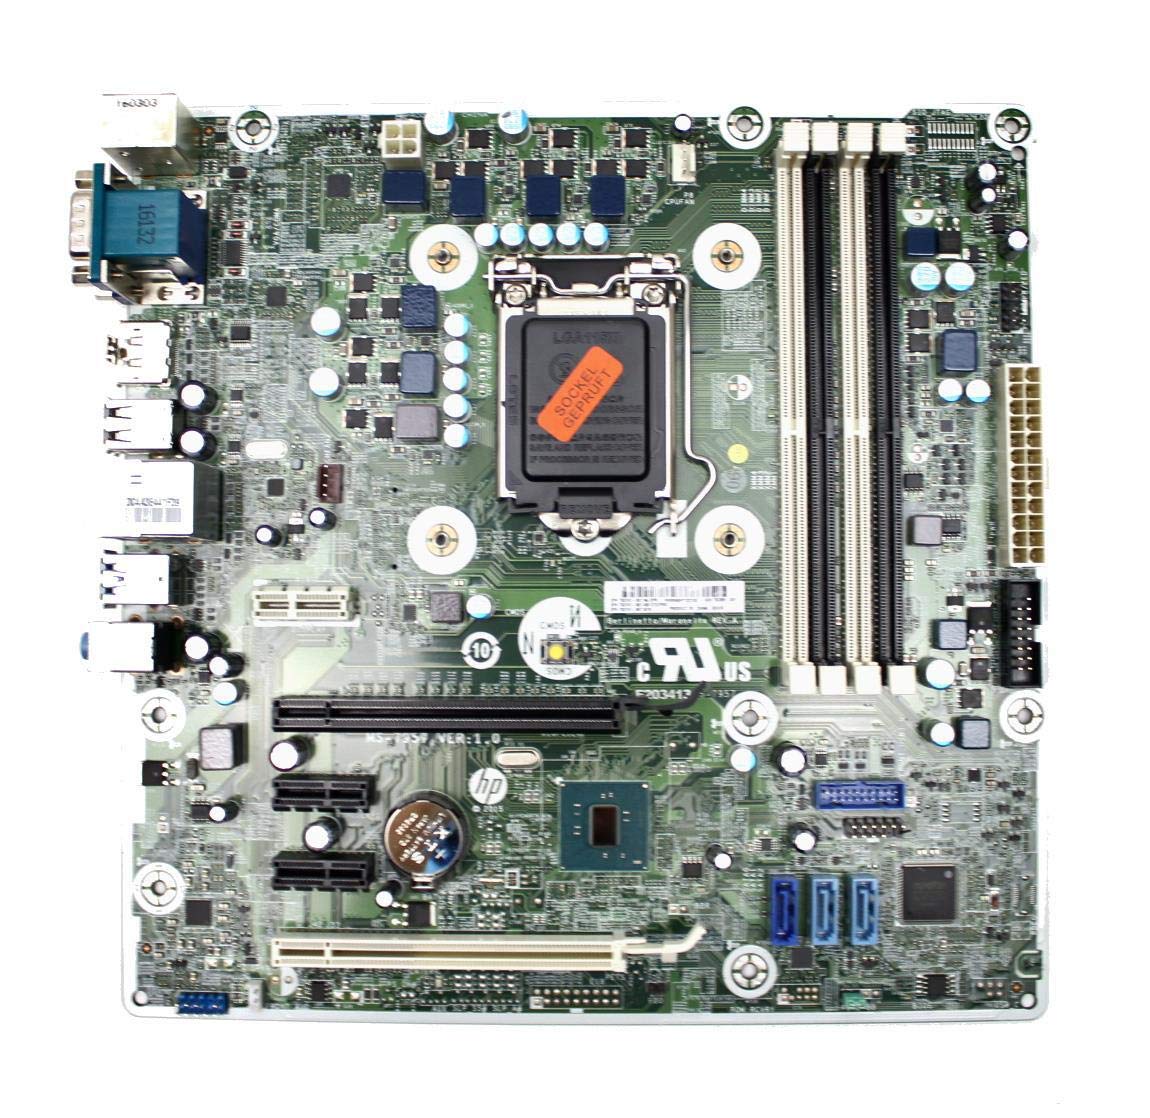
Figure 3: Rear I/O panel of the HP ProDesk 400 G3 MS-7957 motherboard. This image displays the available external connectivity options, including PS/2 ports, serial port, VGA, DisplayPort, USB 2.0, USB 3.0, Ethernet (RJ-45), and HD audio jacks.
Fa'atonuga o Galuega
Malosi muamua
After all components are installed and connected, connect the power cable to the power supply and press the power button on your computer case. The system should initiate the boot process.
Fa'atulagaga o le BIOS/UEFI
To access the BIOS/UEFI setup utility, press the designated key (commonly Del, F2, F10, pe F12) during the initial boot sequence. Here you can configure boot order, system time, and other hardware settings.
Fa'apipi'i Aveta'avale
After installing your operating system, it is crucial to install the latest drivers for your motherboard's chipset, integrated graphics, audio, and network adapter. These drivers can typically be found on the HP support website or the chipset manufacturer's webnofoaga.
Tausiga
- Fa'amamaina: Fa'amama e le aunoa le pefu mai le motherboard ma vaega e fa'aaoga ai le ea fa'amalosi. Ia mautinoa ua tape le masini ma tatala le pala a'o le'i faamamaina.
- BIOS/UEFI Fa'afouga: Periodically check for BIOS/UEFI updates from HP's official support website. Updates can improve stability, compatibility, and performance. Follow update instructions carefully to avoid system damage.
- Fa'afouga ta'avale: Ia fa'afouina pea aveta'avale uma a le polokalama e fa'amautinoa ai le fa'atinoga sili ona lelei ma le fetaui ma polokalama ma masini fou.
Fa'afitauli
O lenei vaega e maua ai fofo i faʻafitauli masani e te ono feagai:
- Leai se Malosi: Check all power connections, including the 24-pin ATX and CPU power cables. Ensure the power supply is switched on and the wall outlet is functional.
- Leai se fa'aaliga: Verify that your monitor is connected to the correct video output (VGA or DisplayPort) and is powered on. Reseat the graphics card (if applicable) and RAM modules.
- Fa'atonuga/Fa'alavelave: This could be due to overheating, faulty RAM, or outdated drivers. Check CPU and GPU temperatures, run memory diagnostic tools, and update drivers.
- E le'i iloa le pito i tua: Ensure the peripheral is properly connected. Try a different port or update the relevant drivers.
- Fa'afitauli BIOS/UEFI: If you encounter issues after changing BIOS settings, try resetting the CMOS by removing the CMOS battery for a few minutes or using the clear CMOS jumper (refer to motherboard diagram for location).
Fa'amatalaga
| Fa'aaliga | Fa'amatalaga |
|---|---|
| Fa'ailoga | HP |
| Socket CPU | LGA 1151 |
| Masini Fegalegaleai | Komepiuta Desktop |
| Tekinolosi RAM | DDR4 |
| Fa'atonuga Fa'atino | Intel Core i3-6xxx, Intel Core i5-6xxx, Intel Core i7-6xxx, Intel Core i3-7xxx, Intel Core i5-7xxx, Intel Core i7-7xxx, Intel Core i3-8xxx, Intel Core i5-8xxx, Intel Core i7-8xxx |
| Ituaiga Chipset | Intel B250 |
| Fa'avae | Pupuni |
| Igoa Fa'ata'ita'iga | MS-7957 |
| Fa'ata'ita'iga PPU | Core i3 (Note: Supports i3, i5, i7 as listed above) |
| Ituaiga Feso'ota'i Malosi Autu | 24 pine |
| Fa'amatalaga Kata Ata | PCI Express |
| Available Memory Slots | 4 |
| Total SATA Ports | 6 |
| Aofa'i Taulaga USB | 2 (Note: Refers to internal headers, rear I/O has more) |
| Aofa'i Taulaga Ethernet | 1 |
| Total PCIe Ports | 3 |
| Tufuga | Computer Store Berlin (Reseller/Supplier) |
| Numera Vaega | 4061435962741 |
| ASIN | B08CS13PTQ |
Fa'amaonia ma Lagolago
O lenei oloa e sau ma se 1 tausaga fa'amaonia mai le aso na fa'atau ai. O lenei tusi saisai e aofia ai fa'aletonu i meafaitino ma galuega i lalo ole fa'aoga masani.
For technical support, warranty claims, or further assistance, please contact your point of purchase or refer to the official HP support resources for the ProDesk 400 G3 series.